Visualizzazione post con etichetta Ottobre. Mostra tutti i post

mercoledì 23 ottobre 2019

Simon Says...SPOOKY!


Ciao a tutti e bentornati! Halloween è sempre più vicino...e si vede dal mio 'mood' sempre più dark...ha ha ha...
Quindi la Sfida del Lunedì di SIMON SAYS STAMP, cioè 'SPOOKY', è assolutamente perfetta!

Hello everyone! Halloween is coming...and you can see as my 'mood' gets darker...ha ha ha...

Lista del materiale usato in fondo al post...Iniziamo!

Supply list at the end of the post...Let's get started!

Ho ritagliato un cerchio che ho usato come maschera per la luna, ne ho tracciato il contorno ed all'interno ho usato parte dello stencil (teschio) con D.I. Hickory Smoke.
- Idea presa in prestito da un tutorial della bravissima Lisa Taggart – Inkybliss Creations
Sempre usando il cerchio come maschera, ho colorato il cielo, iniziando dal colore più chiaro, D.I. Antique Linen, poi Broken China, Stormy Sky, Wilted Violet, poi D.O. Blueprint Sketch, di nuovo il Wilted Violet e per finire Black Soot. Ho fatto cadere delle gocce di acqua e poi spruzzato con inchiostro bianco.
Ho stampato gli alberi prima con inchiostro grigio (Smokey Grey) e poi leggermente spostato, con il nero.
Ho embossato con la 3D Texture Fades 'Lumber' del cartoncino, e per colorarla ho usato i Distress Oxides: ho 'strisciato' il Frayed Burlap sulla superficie, seguendo le linee del 'legno', ho spruzzato con acqua ed asciugato. Ho ripetuto il procedimento con Walnut Stain e Pumice Stone. Ho ritagliato il pezzo che mi interessava ed ho scurito i bordi con D.I. Ground Espresso e Black Soot, e l'ho incollato sulla parte in basso del pannello.

I punched out a circle from cardstock, to be used as mask, traced around it then used part of the 'Skull' stencil inside of the 'moon' with D.I. Hickory Smoke.
- Borrowed the idea from the amazing Lisa Taggart – Inkybliss Creations - 
Always using the mask I have coloured the sky, starting from the lightest colour, D.I. Antique Linen, then Broken China, Stormy Sky, Wilted Violet, D.O. Blueprint Sketch, Wilted Violet again and finished with Black Soot. Let fall few drops of water, then white ink.
I have stamped the tree line using first grey ink (Smokey Grey), then slightly off-set with the black one. I have dry-embossed a piece of cardstock with 3D Texture Fades 'Lumber' and coloured with Distress Oxide inks: following the 'wood' lines, I have 'smooshed' (sorry can't think of another word) Frayed Burlap along the surface, spritzed with water and dried with a heat tool. Repeated the process with Walnut Stain and Pumice Stone. I cut the strip I needed, then deepened the edges with D.I. Ground Espresso and Black Soot, then glued on the bottom part of the panel.


Ho fustellato la scritta ed i corvi su cartoncino nero e li ho incollati, ho aggiunto degli accenti metallici sulla scritta con il Distress Crayon Brushed Pewter, poi ho incollato gli altri elementi. (Idea-Ology)
Sul retro ho incollato del cartoncino per creare spessore ed incollato il tutto su cartoncino nero.
E' una card? E' un pannello? Non lo so...vedremo...

I have die-cut the wording and the crows from black cardstock, glued them in place, added few metallic touches with Distress Crayon Brushed Pewter, then added the final touches (Idea-Ology).
On the back I glued some cardboard to add dimension, then pasted on black cardstock. Is this a card? Is it a panel? I have no idea...will see...


Spero vi sia piaciuto il progetto di oggi, grazie per essere passati...alla prossima!

Hope you liked this project, and thank you for stopping by...see you next time!

Kisses&Hugs!
Simo.

Lista materiale/Supply List:
Stencil #46 'Skull Splash' by AALL & Create
Tree stamp from Tim Holtz Alcohol Ink Kit by Ranger
Distress Oxide inks by Ranger/Tim Holtz;
Blueprint Sketch, Frayed Burlap, Walnut Stain, Pumice Stone
Distress inks by Ranger/Tim Holtz:
Antique Linen, Broken China, Stormy Sky, Wilted Violet, Hickory Smoke, Ground Espresso, Black Soot
Distress Crayon metallic 'Brushed Pewter'
3D Texture Fades 'Lumber' by Sizzix/Tim Holtz Alterations
Thinlits dies by Sizzix/Tim Holtz Alterations:
Scarecrow, Feather & Ravens, Vintage Spirits
Quote Chips 'Halloween' - Idea-Ology by Tim Holtz
Adornments 'Wicked' metal charms – Idea-Ology by Tim Holtz
Versafine Inks: Smokey Grey, Onyx Black


sabato 19 ottobre 2019

Simon Says...All Things Pink...


Ciao a tutti! Eccomi a voi con una card speciale, dedicata a tutte le Donne che combattono o hanno combattuto contro IL nemico invisibile...a quelle che hanno vinto ed a quelle che hanno perso la loro battaglia. La MIA Donna purtroppo è tra queste ultime...sono passati già 20 anni, ma mi manca ancora e sempre...

Hello everyone! Here I am today with a special card, dedicated to all those Women who fight or have fought with THE invisibible enemy...to those who won and those who lost their battle. MY Woman, unfortunately is among the latter...20 years have gone by and I still miss her like crazy, and always will...

Che dite...diamo un'occhiata a come l'ho fatta?
Su del cartoncino per acquerello ho aggiunto della texture con la modeling paste, poi ho spruzzato il Distress Oxide spray 'Picked Raspberry', acqua ed asciugato. Ho spruzzato ancora con 'Flat Fabio - Plumeria Pink' e 'Starburst - Hottie Patottie Hot Pink' di Lindy's Gang ed asciugato di nuovo.
Ho usato il D.O. 'Picked Raspberry' per aggiugere una timbrata tono su tono e poi l'ho ritimbrata con il D.O. 'Hickory Smoke' . Con il D.I. 'Hickory smoke' ho distressato tutti i bordi.

Let's have a look to the step-by-step...
On watercolour paper I have added texture with a stencil and modeling paste, then sprayed with Distress Oxide spray 'Picked Raspberry', added water and let dry. Sprayed again with 'Flat Fabio - Plumeria Pink' and  'Starburst - Hottie Patottie Hot Pink' by Lindy's Gang and let dry.
Stamped an image with D.O. 'Picked Raspberry', then stamped again with D.O. 'Hickory Smoke'. Used D.I. 'Hickory Smoke' to distress the borders.


Per creare il punto focale ho usato lo stencil Mini Silhouette Script di TCW su un cartocino bianco con i seguenti colori: D.O. Tattered Rose, D.I. Victorian Velvet, D.O. Picked Raspberry, D.I. Picked Raspberry e D.I. Hickory Smoke, poi ho ritagliato il tutto.

To create the focal point I have used Mini Silhouette Script Stencil  by TCW on white cardstock, using the following colours: D.O. Tattered Rose, D.I. Victorian Velvet, D.O. Picked Raspberry, D.I. Picked Raspberry e D.I. Hickory Smoke, then fussy cut it.


Ho incollato tutto aggiungendo della garza e del filo, un cuore, del vellum, pezzetti di cartoncino grigio e degli stickers (Small Talk e Big Chat - Idea-Ology TH).

Glued everything together, adding gauze, thread, a die cut heart, vellum, scraps of grey cardstock and stickers (Small Talk and Big Chat - Idea-Ology TH)


Partecipo con questa card alla Sfida del Lunedì di SIMON SAYS STAMP 'All Things Pink'

I submit this card to the Monday Challenge over at SIMON SAYS STAMP 'All Things Pink'

Questo è  tutto...grazie per essere passati di qua...ci vediamo alla prossima!

That's it...thank you for stopping by...see you next time!

BE STRONG ...NEVER GIVE UP...

Kisses&Hugs!
Simo

sabato 12 ottobre 2019

#12MMITags - Ottobre 2019 ...FALL/AUTUMN


Ciao a tutti e bentornati su queste pagine! Oggi volevo mostrarvi la Tag che ho preparato per le #12MMITags di Ottobre, sfida mensile del Gruppo FacebookMixed Medi@ Italia.
Sotto potrete vedere la Moodboard di ispirazione...adoro i colori autunnali, le zucche, Halloween..insomma l'autunno è la mia stagione.
Ho deciso inoltre di partecipare con questa Tag alla sfida del Lunedì sul Blog diSimon Says Stamp, visto che il tema è 'FALL/AUTUMN'. Per completare l'opera i prodotti nello spotlight sono quelli di TIM HOLTZ, quindi non vedevo l'ora...

Hello everyone and welcome back! Today I would like to show you the Tag for October, made for the #12MMITags monthly challenge on the Facebook Group Mixed Medi@ Italia.
You will find the inspirational Moodboard here below...I love Fall colours, pumpkins, Halloween...what can I say...Autumn is my Season.
Besides I have decided to submit this Tag to the Monday Challenge over at SimonSays Stamp Blog, since the theme is 'FALL/AUTUMN' . Moreover they showcase TIM HOLTZ products, so I really couldn't wait...


Come sempre trovate l'elenco dei prodotti usati in fondo al post.
As usual you will find the supply list at the end of this post.

Iniziamo! Ho usato del cartoncino pesante per acquerello, poi ho 'costruito' il mio background usando rimasugli di pagine di libro, del washi tape e collage paper, incollandoli con un medium per collage.
Dopodichè ho aggiunto texture con pasta Stencil light ed uno stencil e quando asciutto ho fatto cadere delle gocce di Distress Resist Spray (che una volta asciutto 'resiste' al colore aggiunto successivamente) per creare più interesse.

Let's start! I have used heavy cardstock for watercolour, then built my background glueing scraps of book pages, designer tape and collage paper using Collage Medium.
Afterwards I added texture using stencil and light Stencil paste, let dry and added Distress Resist spray to add more interest.


Come colori ho usato i Distress Oxide Sprays, nei toni caldi dell'autunno (Fossilized Amber, Spiced Marmalade e Vintage Photo), diluendo con acqua. Ho asciugato bene e poi ho timbrato qua e là, aggiungendo qualche dettaglio in più.

I have used Distress Oxide Sprays, Fossilized Amber, Spiced Marmalade and Vintage Photo, spritzing with water to move the colour, let dry and added few details, stamping here and there.


Poi, come capita spesso, ho deciso di fare qualche prova e giocare un po': ho usato delle foglie fustellate, le ho colorate con vari Distress, poi le ho incollate sulla parte sinistra della Tag, e dopo avere tamponato con un tampone per embossing, ho coperto con la Baked Texture Vintage Beeswax, ho riscaldato ancora con l'embosser ed ho fatto cadere anche un po' di Chunky Rust in alcuni punti. Adoro l'effetto finale.

Then, as usual, I have decided to play and experiment a bit: I have glued 3 die cut leaves, coloured with Distress inks, then 'stamped' with an embossing pad and covered with Baked Texture Vintage Beeswax, heated again with the heat tool and added few flecks of Baked Texture Chunky Rust. I love the result.


Ora non rimane che assemblare il tutto: ho usato degli Ephemera, della garza, filo, Paper Dolls e stickers e per finire nastro e charms in metallo.

Now let's build the focal point: I have used Ephemera, gauze, thread, Paper Dolls, stickers, a ribbon and metal charms.

.


Spero vi sia piaciuto questo progetto...grazie per essere passati di qua! Ci vediamo alla prossima.

I hope you enjoyed this project...thank you for stopping by! See you next time.

Kisses&Hugs!
Simo.

Lista materiale usato / Supply list:

Distress Collage Medium 'Vintage' – Ranger/Tim Holtz
Distress Resist Spray - Ranger/Tim Holtz
Distress Oxide Sprays – Fossilized Amber, Spiced Marmalade, Vintage Photo - Ranger/Tim Holtz
Distress Archival Ink Black Soot - Ranger/Tim Holtz
Layering Stencil 'Autumn' – Stampers Anonymous/Tim Holtz
Lady Rose stamp set - Stampers Anonymous/Tim Holtz
Tattered Leaves Bigz Die – Sizzix/Tim Holtz Alterations
Collage Paper 'Halloween' – Idea-Ology by Tim Holtz
Design Taper 'French' – Idea-Ology by Tim Holtz
Big Chat stickers - Idea-Ology by Tim Holtz
Small Talk stickers - Idea-Ology by Tim Holtz
Ephemera 'Thrift Shop' - Idea-Ology by Tim Holtz
Ephemera 'Halloween' - Idea-Ology by Tim Holtz
Paper Dolls 'Ancestors' - Idea-Ology by Tim Holtz
Mini Paper Clips - Idea-Ology by Tim Holtz
Loop Pins - Idea-Ology by Tim Holtz
Muse Tokens 'Halloween' - Idea-Ology by Tim Holtz
Stencil Paste Light – TommyArt
Baked Texture embossing powder 'Vintage Beeswax', 'Chunky Rust' – Emerald Creek/Seth Apter


venerdì 26 ottobre 2018

Simon Says: HALLOWEEN/SPOOKY...


Ciao a tutti...che ci volete fare o niente post per 2 settimane o 2 post in 2 giorni...Lol!
Potevo non partecipare alle 2 Sfide settimanali di SIMON SAYS STAMP, visto che il tema per entrambe è HALLOWEEN/SPOOKY? Era un MUST! Ed eccoci qua...

Hello everyone...what can I say? O no posts for 2 weeks or 2 posts in 2 days...Lol!
But how could I resist the 2 weekly Challenges over SIMON SAYS STAMP Blogs, as the theme for both is HALLOWEEN/SPOOKY? It was kind of mandatory! So here we are...


Lista dei materiali usati in fondo al post...
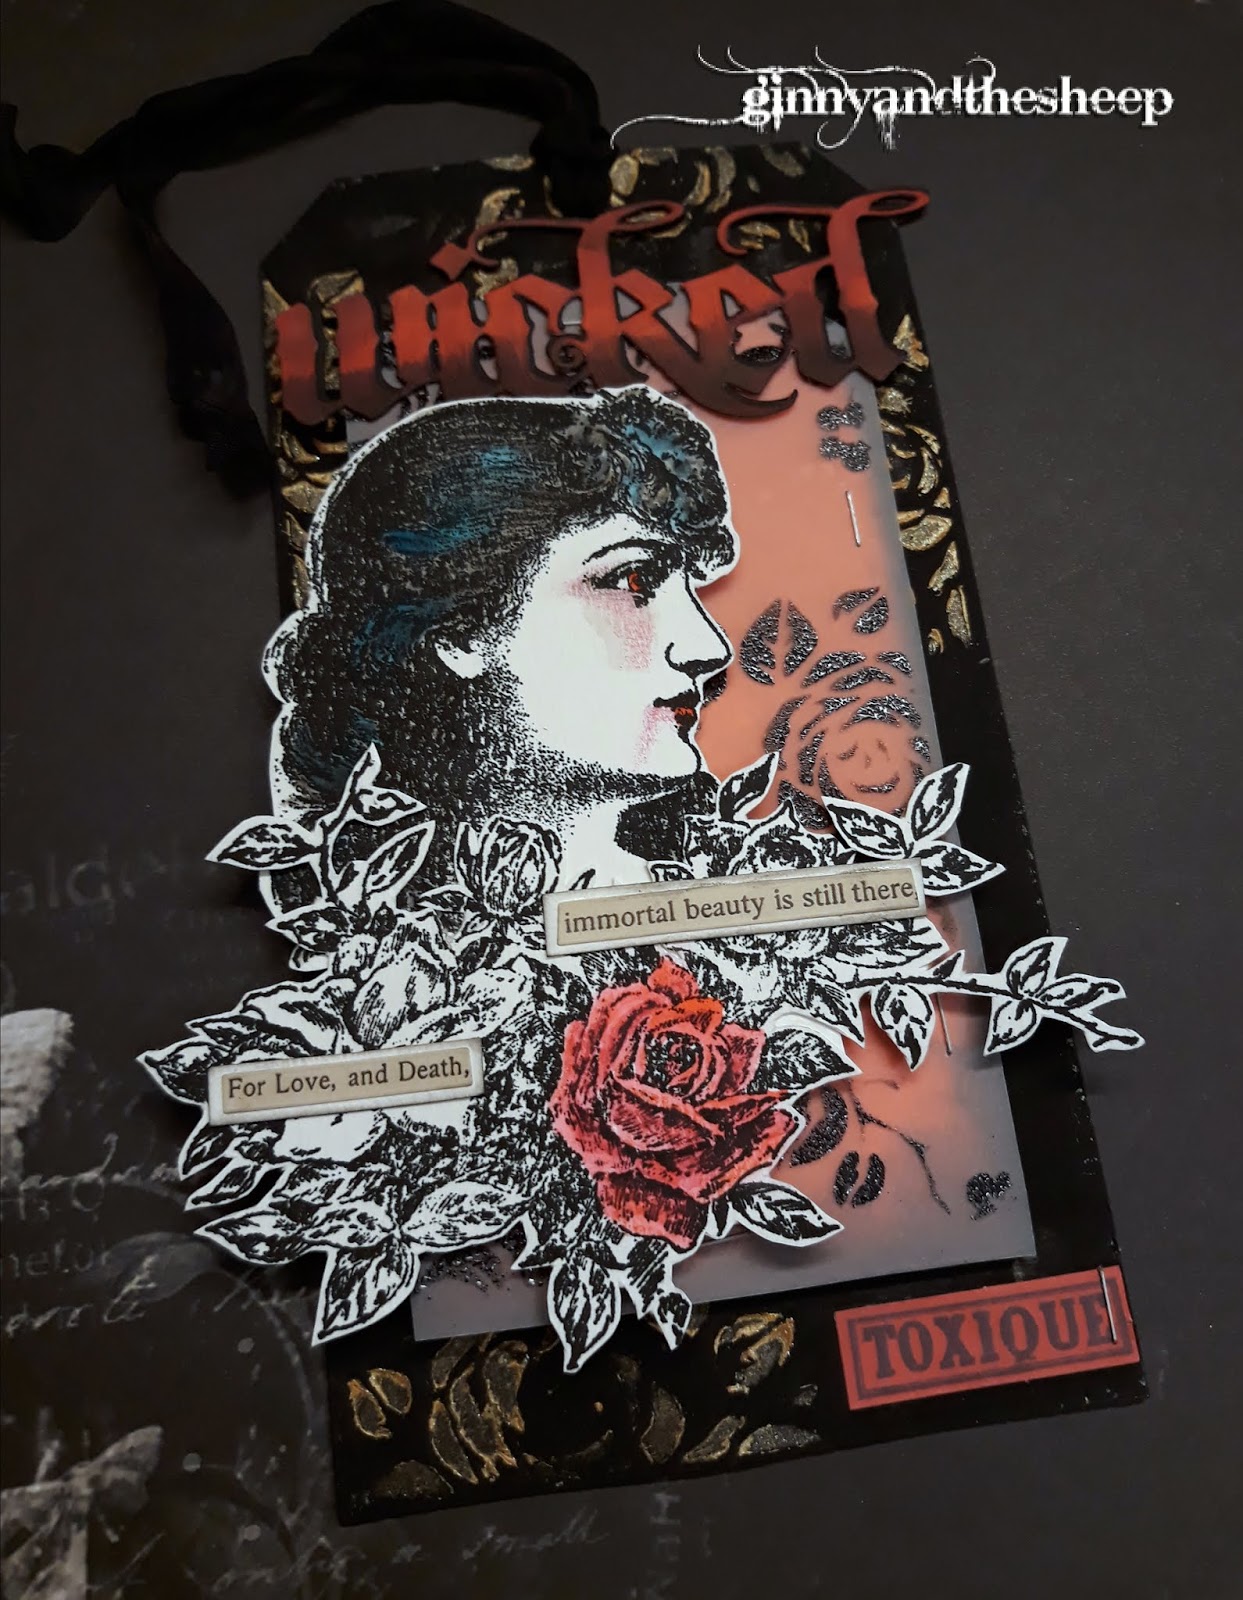
Ho passato il Gesso nero su un cartoncino per acquerello, poi con lo stencil 'ROSES' ho steso il Distress Crayon Metallic Tarnished Brass e messo da parte. Preso una tag più piccola e coperta con D.O. Candied Apple, spruzzata con acqua, scuriti i margini con D.O. e D.I. Black Soot poi ho trasferito lo stencil 'ROSES' su del vellum con il D.O. Black Soot ed embossato con la Baked Texture Rocky Road, ho attaccato il vellum con delle graffette alla tag rossa e tagliato l'eccesso. Con biadesivo spessorato ho incollato la tag nel centro della Tag più grossa.


You'll find the list of the supplies at the end of this post...
Covered a piece of watercolour paper with Black Gesso, then used stencil 'ROSES' and Distress Crayon Metallic Tarnished Brass and set aside. Covered a smaller tag with D.O. Candied Apple, spritzed with water, darkened the edges with  D.O. and  D.I. Black Soot then used again stencil 'ROSES' on vellum with D.O. Black Soot and  embossed with Baked Texture Rocky Road, stapled the vellum onto the red tag and cut off the excess. With foam tape attached this tag in the middle of the previous one.


Ho usato il set 'LADY ROSE' di Stampers Anonymous/Tim Holtz Collection per creare una bellissima ma inquietante Femme Fatale, colorando solo alcune porzioni del timbro, così come un'unica rosa rosso sangue...he he he...doveva essere Spooky no?
Ritagliato ed incollato sopra al vellum.


Used stamp set 'LADY ROSE' by Stampers Anonymous/Tim Holtz Collection to create a beautiful but creepy Femme Fatale, adding only few touches of colour, just like only 1 blood red rose...he he he...well...it should be Spooly, right? 
Fussy cut and glued on top of vellum.


Ho fustellato 2 volte la parola 'WICKED' con il set Thinlits 'VINTAGE SPIRITS' di Sizzix/Tim Holtz Alterations: 1 su cartoncino nero ed una su cartoncino per acquerello...quest'ultima l'ho colorata con D.O. Candied Apple e D.I. Fired Brick e Black Soot. Le ho incollate insieme, leggermente sfalsate ed incollate sulla tag. Ho aggiunto due frasi prese dagli Halloween Clipping Stickers ed una Ephemera Halloween...Che dite...avete paura?

Die cut twice the word 'WICKED' from the Thinlits set 'VINTAGE SPIRITS' by Sizzix/Tim Holtz Alterations: 1 on black cardstock and 1 on watercolour paper..I have coloured the latter with D.O. Candied Apple and D.I. Fired Brick and Black Soot, I glued them together slightly offset and added to the tag. Finished the project with a couple of Halloween Clipplings stickers and a Halloween Ephemera....What do you say...Are you scared?


Lista dei materiali / Supplies list:

- Prima Marketing/FINNABAIR BLACK HEAVY GESSO
- Stampers Anonymous/TIM HOLTZ Collection Layering Stencil 'ROSES'
- Stampers Anonymous/TIM HOLTZ Collection 'LADY ROSE' Stamp
- Sizzix/TIM HOLTZ Alterations 'VINTAGE SPIRITS' Thinlits
- Ranger Distress Crayon Metallic TARNISHED BRASS
- Ranger Distress Oxide Inks: CANDIED APPLE - BLACK SOOT
- Ranger Distress Inks: FIRED BRICK - BLACK SOOT
- Tim Holtz Idea-ology Halloween Clippings Stickers
- Tim Holtz Idea-ology Ephemera Pack Halloween
- Emerald Creek/SETH APTER Baked Texture ROCKY ROAD

Partecipo con questa tag alle seguenti Sfide / I submit this tag to the following Challenges:

- SIMON SAYS STAMP MONDAY CHALLENGE BLOG: HALLOWEEN/SPOOKY

- SIMON SAYS STAMP WEDNESDAY CHALLENGE BLOG: HALLOWEEN/SPOOKY

Grazie per essere passati di qua...spero che questa tag vi sia piaciuta! Ci vediamo alla prossima...

Thank you for stopping by...hope you enjoyed this tag! See you next time...

Kisses&Hugs!
Simo.

giovedì 25 ottobre 2018

The Parting Guest...AALL & Create Guest Design project


Ciao a tutti e bentornati! Qualche tempo fa mi è stato chiesto di diventare Guest Designer per AALL & Create fino a fine Dicembre...vi lascio immaginare la mia gioia...adoro i loro timbri e stencil, quindi poterci giocare a piene mani è veramente il massimo!
Questo è il mio secondo progetto, realizzato in pieno spirito di Halloween...ve lo avevo detto che ero entrata in Halloween MODE on giusto?

Hello everyone and welcome back! Some time ago I have been asked to join as Guest Designer the amazing Team of AALL & Create, till the end of December...well...just imagine how much this has meant to me, how happy and honoured I am...I love their stamps and stencils and being able to have fun and play with these gorgeous goodies is absolutely amazing!
This is my second project for the GDT, and I am in full Halloween mode...didn't I warn you I was going full Halloween MODE On?


Ho utilizzato del cartoncino per acquerello e per lo sfondo ho usato i Distress Oxide Inks: Iced Spruce, Hickory Smoke, Stormy Sky, Black Soot e Ripe Persimmon...perchè un tocco di arancio ci sta troppo bene, ed anche perchè è diventato il mio colore preferito...lol!
Ho fatto cadere delle gocce di acqua, poi ho scurito bene i bordi e la porzione superiore con il Distress ink Black Soot, ho fatto cadere delle gocce di inchiostro bianco e poi con lo stencil #37 'Cracked walls 1' creato da Olga Heldwein e la modeling paste nera della DecoArt Media ho creato il 'muretto', per aggiungere un po' più di interesse.
Con le fustelle Movers&Shapers Vintage Cabinet e mini Cabinet ho creato la lapide del povero Signor John Doe, e la parte superiore della tag, ho incollato delle lettere ritagliate con le thinlits 'Alphanumeric' e la Decorative Strip 'Wanted Alphabet', ho coperto di gesso bianco e poi colorato con i Distress Oxide e gli Ink pads Hickory Smoke e Black Soot, poi ho scurito ed invecchiato il tutto con i Distress Crayons negli stessi colori. Poi con il Distress Oxide Black Soot ho timbrato con uno dei timbri nella plancia #125 'For the Record' creati da Aida Domisiewicz, per simulare le crepe. Ho stampato la luna dal set #22, fantasmi, zucchetta e banner dal set #136 'Spooks' entrambi di Olga Heldwein...il bello di questo set è che avete tante espressioni tra cui scegliere perchè sia il fantasma che la zucca sono vuoti nel mezzo...quindi potrete sbizzarrirvi. Per colorare le timbrate ho usato dei pennarelli acquarellabili, poi sui fantasmini ho steso un po' di Distress ink Antique Linen...mi sembrava perfetto!
Ho fustellato il corvo con le thinlits 'Feather & Ravens', ho incollato i vari pezzi ed ho utilizzato i Clipping stickers Halloween per aggiungere il testo.

I have used watercolour heavy cardstock and did my background using Distress Oxide Inks: Iced Spruce, Hickory Smoke, Stormy Sky, Black Soot and Ripe Persimmon...because a touch of orange is perfect...and because this colour is becoming my favourite...lol!
I flicked some droplets of water, then darkened the edges with Black Soot Distress ink pad, added DecoArt Media Black Modeling paste through stencil #37 'Cracked walls 1' designed by Olga Heldwein, to give a bit more of interest.
With Movers&Shapers dies Vintage Cabinet and Mini Cabinet I have created the tombstone and the top part of the tag, glued letters die-cut with 2 different Alphabet dies, covered with gesso and then painted with Distress Oxides and Ink pads Hickory Smoke and Black Soot, then darkened with the same colours in Distress Crayons .With Distress Oxide Black Soot I have stamped the 'cracks' with one of the stamps of the set #125 'For the Record' designed by Aida Domisiewicz.
Have used set #22 to stamp the Moon, set #136 'Spooks' to stamp the Ghosts, the pumpkin and the banner...both these stamp sets are designed by Olga Heldwein...what's great about the 'Spooks' stamp set is that both Pumpkin and Ghost are blank and you have a lot of expressions to choose from...is just so much fun! For the colouring I have used water based brush pens, then on the Ghosts I have added a hint of Antique Linen Distress ink...seemed so appropriate!
Die-cut the Raven with 'Feather&Ravens' thinlits, glued together all the pieces and added text with Halloween Clipping Stickers.


Allora...che ne dite di questa scena spaventosa? He he he...ma chi voglio prendere in giro...non sono troppo adorabili questi fantasmini?

So.. what do you say about this Scary scene? He he he...who I am kidding? They are too cute to spook!

E con questo vi saluto...grazie per essere passati di qua...ci vediamo alla prossima!

That's it...thanks for stopping by...see you next time!

Kisses&Hugs!

Simo.


mercoledì 3 ottobre 2018

A Distinguished Gentleman...


Ciao a tutti! Eccomi con una nuova tag decisamente ispirata ad Halloween...e preparata per la nuova sfida del Lunedì di SIMON SAYS STAMP... 'TAG IT!' e come 'richiesto' utilizzando i prodotti di Tim Holtz.

Hello everyone! Here I am with a new tag most definitely inspired to Halloween...and it's also my take on the new Monday Challenge over at SIMON SAYS STAMP Blog...'TAG IT!', showcasing Tim Holtz Products.


Per prima cosa ho utilizzato la Tag più grossa del set 'Tag Collection' #658784 di Sizzix/Tim Holtz Alterations, per tagliare del cartoncino per acquerello, con il Layered Stencil 'Stiched' THS099 di Stampers Anonymous/Tim Holtz Collection ho aggiunto la Texture Paste Opaque Crackle della Ranger, ed una volta asciutta  ho usato i seguenti Distress Oxide Inks:
Frayed Burlap, Ground Espresso e Ripe Persimmon, ho aggiunto poi i Distress Inks Antique Linen, Rusty Hinge, Ground Espresso e Black Soot. Sempre con il Black Soot ho aggiunto alcuni dettagli con lo stencil 'Halloween Script' THS063 ed ho messo da parte.
Su di un cartoncino di recupero ho timbrato l'immagine presa dal set 'Dapper' CMS267 di Stampers Anonymous/Tim Holtz Collection, usando la Stamping Platform della Tonic Studios/Tim Holtz e l'Archival Ink Distress Black Soot della Ranger, ho colorato alcune parti con i Distress Markers Wilted Violet e Spiced Marmalade ed ho ritagliato. Ho timbrato il teschio usando il set 'King Mortimer' #66 di Olga Heldwein per AALL and Create e l'ho ritagliato, poi ho assemblato il 'Distinto Gentiluomo' sulla tag, ho aggiunto un Ephemera 'Halloween' #TH93603 di Tim Holtz Idea-ology e per completare alcune frasi dai Clippings stickers 'Halloweeen' #TH93619 Tim Holtz Idea-ology.
Su di un cartoncino ho steso del gesso nero, poi ho utilizzato lo stencil 'Gothic' THS026 ed il Distress Oxide Ripe Persimmon, ho asciugato e tagliato a forma di tag. Ho incollato la tag preparata in precedenza sopra a quella nera, con del biadesivo spessorato, aggiunto dei nastri decorativi e la Tag del 'Distinto Gentiluomo' è fatta.

I have used the larger Tag from 'Tag Collection' #658784 set by Sizzix/Tim Holtz Alterations, to cut a piece of watercolour paper, with Layered Stencil 'Stiched' THS099 by Stampers Anonymous/Tim Holtz Collection added Texture Paste Opaque Crackle by Ranger, and once dry I have used the following Distress Oxide Inks:
Frayed Burlap, Ground Espresso and Ripe Persimmon, then added Distress Inks Antique Linen, Rusty Hinge, Ground Espresso and  Black Soot. Always with  Black Soot added few details with  stencil 'Halloween Script' THS063 and set aside.
On a piece of cardstock I have stamped the image from the set 'Dapper' CMS267 by Stampers Anonymous/Tim Holtz Collection, using Stamping Platform by Tonic Studios/Tim Holtz and Archival Ink Distress Black Soot by Ranger, painting few details with  Distress Markers Wilted Violet and Spiced Marmalade, then fussy cut it. Stamped the skull using  'King Mortimer' set #66 designed by Olga Heldwein for AALL and Create and cut it out, then assembled the  'Distinguished Gentleman' on the tag, added a 'Halloween' Ephemera #TH93603 by Tim Holtz Idea-ology and few Tim Holtz Idea-ology  'Halloweeen' Clippings stickers #TH93619 .
Added black gesso to a piece of cardstock, then used stencil 'Gothic' THS026 and Distress Oxide Ripe Persimmo, heat set and cut to a Tag shape. I glued the first tag on the black one using double sided foam tape, added some ribbon and the 'Distinguished Gentleman' Tag is done. 


Spero vi sia piaciuta questa tag...e grazie per essere passati! Ci vediamo alla prossima!

Hope you liked this tag and thank you so much for stopping by! See you next time!

Kisses&Hugs!
Simo.

lunedì 30 ottobre 2017

Delicate...


Ciao a tutti e bentornati su queste pagine! Oggi voglio mostrarvi una nuova pagina del mio Art Journal, un progetto legato alla sfida di Ottobre di More Than Words...diciamo che sono arrivata in 'zona Cesarini'...Lol!

Hello everyone and welcome back! Today I want to show you a new spread in my Art Journal, made for the More Than Words October Challenge...let's just say I'm barely on time...Lol!


Come potete notare dalla 'Moodboard' qui sopra le richieste erano due:

- Parola di ispirazione 'DELICATE'
- Sfida creativa 'TESSUTI' - Nastri, pizzo, juta, denim...
Ed è così che è nata questa pagina di Art Journal...
Ormai sapete che questo Journal lo utilizzo per le 'Grandi Occasioni', o meglio per le pagine che hanno un significato particolare per me...ebbene, per questa sfida ho deciso di utilizzare una foto della mia adorabile nipotina Giada, nel suo costumino da Streghetta...Una premessa...questa piccola donna di 4 anni è tutto tranne Delicata...Però, di tanto in tanto, come ogni donnino che si rispetti, ha questi momenti vezzosi (e...cuore di zia...totalmente adorabili...)..ditemi...avete mai visto una Streghetta più carina?

As you can see from the Moodboard above, I had to stick to the following

- Word Inspiration 'DELICATE'
- Creative Challenge ' FABRICS'
And so this Art Journal spread came to be...
By now you all know that this is the 'Special Occasions' Journal, or, better...that I use this Journal to create pages that have a very special meaning to me...well...for this challenge I have decided to use a picture of my adorable niece Giada, wearing her 'Witchy' costume...now I have to tell you...this 4 years old little woman is anything but Delicate...But from time to time, just like any other girlie, she has these lovely and very feminine moments (and to me totally adorable...yes I'm a very proud Auntie!)...now tell me...have you ever met a more charming Witch?


Con il Soft Matte Gel ho incollato prima delle strisce di pagine di libro, poi dei pezzi di pizzo. Ho anche aggiunto un pezzo di nastro di juta. Ho coperto tutto con il Gesso Bianco, poi aggiunto qua e là della Modeling Paste e una volta asciutto ho spruzzato con gli Sprays della Lindy's...
Ho aggiunto della garza e del filo nero, e poi dei fiori e foglie ritagliati da pagine di un libro.
Qualche fustellata di fiore e foglie su cartoncino nero e poi ho incollato delle perline nere e del glitter. Ho schiarito con dei tocchi  di acrilico Vivace oro bianco metallico e poi ho incollato le lettere che formano la parola 'DELICATE', dopo averle ricoperte con Heavy Gesso Black e spruzzate con Starburts Long John's Silver.

I have glued paper strips, pieces of lace and a piece of burlap ribbon using Soft Matte Gel. Covered everything with White Gesso, added few touches of Modeling Paste and once dry I have sprayed with Lindy's Sprays...
Added gauze and black thread, then flowers and leaves cut from book pages, few cut-outs from black cardstock, and black pearls and glitter. I added few touches of Vivace  metallic white gold acrylic paint, painted the letters with Heavy Black Gesso then sprayed with Starburst Long John's Silver and glued down on the page.

E per oggi è tutto...Giusto in tempo per Halloween..alla prossima!

That's it for today...Right on time for Halloween..see you next time!

Kisses&Hugs!
Simo.


venerdì 27 ottobre 2017

The Breath of Nature...


Ciao a tutti...come va? Eccoci di nuovo qui con un paio di sfide...
La prima riguarda lo Stage n.3 del Joint Project 'Creative Art' sul blog di Mixed Media & Art, la seconda è la Sfida di Ottobre della Lindy's Gang...

Hello everyone...how are you doing? Here we are, once again with a couple of challenges...
The first one is about Stage 3 of the Joint Project 'Creative Art' on Mixed Media & Art Blog while the second one is the October's Challenge over at Lindy's Gang blog and Facebook page...

Il tema dello Stage 3 è appunto 'The Breath of Nature' (il respiro della Natura) ed i nuovi prompt per questa sfida erano incorporare nel progetto qualcosa di reperito in natura, che non si possa trovare nei negozi Scrap, e l'uso di LETTERE, in qualsiasi forma...quindi ho abbinato le due sfide, utilizzando i colori presenti nella Color Challenge di Lindy's (anche se non ho letto bene e non ho utilizzato la polvere da Embossing...ooops!)

Stage 3 new theme is 'The Breath of Nature' and the new prompts were to use something found in nature, that you could not buy in a scrap store, and LETTERS, in any form...so I just mixed the two challenges, as I got my color inspiration from Lindy's Color Challenge chart (even if I didn't read well the blog post and didn't use any Embossing powder...ooops!)

Quindi da questo nasce la mia 'Salvaged Tag' - 'Salvaged' significa 'Recuperato, Preservato'...e se avrete pazienza di seguirmi capirete che c'è del metodo nella mia pazzia...Lol!
Tempo fa ho recuperato un pezzo di legno da un giardino, dopo che gli alberi erano stati tagliati...della serie 'non si sa mai'...poi ho pensato che, dal momento che i libri vengono fatti con gli alberi, usare alcune pagine (quindi LETTERE) fosse un po' come dare nuova vita a questo povero albero morto...da qui anche la scelta di fustellare delle foglie sempre dalle pagine del libro...in fondo sono foglie 'di recupero' che saranno preservate in questo progetto. E la Paper Doll, mi chiederete voi...cosa c'entra?
E io vi dico...è una Paper Doll...sta bene a prescindere! ;-) (e poi ha un fiore sul bavero della giacca..fiore..Natura...ve l'ho detto che tutto era collegato!)

And from this my 'Salvaged Tag' is born...and as Salvaged means 'Retrieved, Preserved, Restored'...if you bear with me you'll see that there is a method in my madness..Lol!
While ago I salvaged a scrap of wood in a garden, after the trees were chopped...because 'you'll never know'...so I thought that, as books are essentially made of trees, using few pages (hence LETTERS), was like giving a new life to this poor dead tree...from this the choice of using book pages to die cut some leaves...somehow restored and preserved in this project. And now you will ask me...What about the Paper Doll?
And I say...Why not? Paper Dolls are a nice touch on anything! ;-) (and this one has a flower on his lapel...flower...Nature...I told you that everything was connected!)


Ah...per questa Tag, ho riutilizzato quante più cose di carta e cartone mi sono capitate a tiro...si...conservo le buste di Amazon...he he he...

Ah...for this Tag I have recycled every single thing made of paper  I could lay my hands on...and yes...I do hoard Amazon envelopes...he he he...

Ho incollato tutto con il Soft Matte Gel, ritagliando delle strisce dalle pagine ed incollandole sulla base, per aggiungere più movimento, poi ho ricoperto tutto con del Gesso bianco. Ho aggiunto della pasta modellabile usando lo Stencil Autumn di Tim Holtz, ed una volta asciutto ho iniziato a spruzzare con i Lindy's (trovate l'elenco in fondo). Ho creato un po' di ombreggiature per le foglie e in alcuni punti dell'intreccio di carta usando il Magical Midnight Rendezvous ed un pennello a serbatoio.
Poi sempre con gli spray ho colorato le foglie, ho aggiunto una fustellata di Wildflowers di Tim Holtz su cartoncino nero, ed assemblato il tutto.

I have glued everything down using Soft Matte Gel, also cutting strips from the book pages to add more texture, then covered with a wash of White Gesso. Added also Modeling Paste using Tim Holtz Layering Stencil Autumn, and once dry I started spraying with Lindy's goodies (you will find the list at the bottom of this post). Added some shadow to the leaves and the paper strips with Magical Midnight Rendezvous and a water brush.
Sprayed also the die-cut leaves, added a Tim Holtz Wildflower die cut from black cardstock and glued all the embellishments to the Tag.


Presento questo progetto per le seguenti sfide / I submit this project to the following challenges:


E con questo è tutto...grazie per essere stati in mia compagnia per un po'...alla prossima!

That's it...thank you for popping by...see you next time!

Kisses&Hugs!
Simo.


mercoledì 25 ottobre 2017

MONOCHROMATIC CHALLENGE...


Ciao a tutti e bentornati! L'influenza sembra debellata...teniamo le dita incrociate...quindi...spazio alle Sfide!!!

Hello everyone and welcome back! Apparently I fought back the flu...fingers crossed...so...let the Challenges begin!!!

Mi sono fatta ispirare dal tema della Sfida settimanale del Blog SIMON SAYS STAMP MONDAY CHALLENGE , cioè MONOCHROME, e mi sono divertita a giocare con i toni del beige e del nero...

I have got my inspiration from this week's Challenge theme over at SIMON SAYS STAMP MONDAY CHALLENGE Blog, that is MONOCHROME, and have fun with beige and black hues...


Questi sono i materiali usati/These are the materials used:
- Gel Medium
- Gesso Bianco - White Gesso
- Modeling Paste
- Distress Oxides 'Antique Linen' ,  'Black Soot'
- Distress Crayons 'Antique Linen' ,  'Black Soot'
- Lindy's Stamp Gang Flat Fabio spray 'Café au Lait'
- Lindy's Stamp Gang Moon Shadow Mist 'Long John's Silver'
- Tim Holtz Mini Stencil Set n.24
- Archival Ink Black
- Stampers Anonymous/Tim Holtz Lady Rose Stamp set
- Sizzix/Tim Holtz Alterations Garden Greens
- Tim Holtz Idea-ology 'Adage Tickets'
- Tim Holtz Idea-ology 'Memo Pins'
- Tim Holtz Idea-ology 'Paper Dolls'
- Tim Holtz Idea-ology 'Quote Chips'
- 2 6x6 " Graphic 45 Mon Amour Patterns&Solids
- Fiore di juta e cordino / burlap flower and string
- Cartoncino di recupero / recycled cardboard
- Carta patterned / Patterned paper


Ho incollato con il gel medium della carta patterned su di un rettangolo di cartoncino di recupero, ho passato il gesso bianco, steso della modeling paste con lo stencil, poi ho steso il Distress Oxide 'Antique Linen' e spruzzato con acqua. Asciugato e ripetuto. Poi ho iniziato a spruzzare con lo spray Café au Lait ed aggiunto acqua. Asciugato, aggiunto qualche tocco di Long John's Silver , diluito con acqua ed asciugato. Passato con i Distress Crayons sulle parti in rilievo, poi ripassato tutti i bordi con il Distress Oxide Black Soot.
Ho stampato l'immagine con l'inchiostro Archival sul foglio della Graphic 45 beige (dalla foto non si vede molto, ma è decorato con delle rose tono su tono), ho rovinato i bordi con le forbici ed invecchiati con il Black Soot. Ho distressato nello stesso modo anche il foglio nero e l'ho incollato sotto a quello timbrato. Per avere un po' di spessore ho incollato sotto a tutto del cartoncino e poi attaccato alla base.
Ho incollato anche le varie fustellate, il cordino ed il fiore, poi questi Sposini deliziosi, dalle fantastiche Paper Dolls. Ho aggiunto gli ultimi tocchi con la memo pin ed i 2 biglietti ed una Quote Chip...ed il lavoro è terminato. Non ho ancora deciso cosa farne...una card...decorare la parte frontale di un Album di foto...le possibilità sono tante...

Attached a patterned paper to a piece of recycled cardboard using Gel Medium, then washed over with White Gesso, dried and added Modeling Paste through a stencil. Started adding the colours first with Distress Oxide 'Antique Linen, and spritzed with water. Dried and repeated the process. Then sprayed with Café au Lait, dried, added few touches of  Long John's Silver and sprayed with water. When dry smudged Distress Crayons over the raised parts, then Distress Oxide Black Soot over the edges.
Stamped the image with Black Archival Ink on a sheet of 6x6 Graphic 45 paper (you can hardly see it in the pic, but it has roses printed on it), distressed the edges with scissors and then with Black Soot. Used the same method on the black sheet of pape, and glued it under the stamped one. Added some spare cardboard under these to raise them, then attached everything to the base, the die-cuts, some string, the flower, these adorable Newly Weds, from the amazing Paper Dolls. Added few final touches with a memo pin and 2 tickets and a Quote Chip...and the project is finished. I still have to decide what it will become...a card...the front cover of a Photo Book...so many possibilities...

Presento questo progetto per le seguenti sfide / I submit this project to the following  Challenges:

- SIMON SAYS STAMP MONDAY CHALLENGE BLOG: MONOCHROME

- CREATIVE ARTISTE MIXED MEDIA BLOG: CREATIVE ARTISTE CHALLENGE 31
  "ANYTHING MIXED MEDIA GOES"

E con questo è tutto...grazie per essere passati di qua...ci vediamo alla prossima!

This is it...thank you so much for stopping by...see you next time!

Kisses&Hugs!
Simo.