Visualizzazione post con etichetta tutorial.. Mostra tutti i post

lunedì 5 dicembre 2016

12 Tags of 2016 - Technique Remix - December...


Ciao a tutti! E' incredibile che sia già Dicembre...un intero anno di Tags!!! E' stato un bellissimo viaggio, e devo ringraziare tantissimo Tim Holtz per aver condiviso con noi le sue idee e le sue tecniche...quella della 'Technique Remix' è stata davvero geniale!!!
In questo arco di tempo ho imparato a mettermi in gioco...provare tecniche nuove...cercare di arrivare ad un risultato soddisfacente senza avere tutti i materiali elencati...è stata dura, è stato intenso, è stato fantastico!

Hello everyone! It's quite incredible that it's December already...a whole year long of Tags!!! It has been an amazing journey, and must thank Tim Holtz so much for sharing with us his ideas and techniques...I must say that the 'Technique Remix' has been a brilliant idea, just genius!!!
During this year I have learnt to challenge myself...experimenting new techniques...trying to achieve a good result without all the materials listed...has been tough, has been intense, has been fantastic!

Quindi, senza ulteriori indugi ecco la mia versione della Tag di Dicembre della serie 12 Tags of 2016 - Technique Remix:

So, without further ado, here's my take on the 12 Tags of 2016 - Technique Remix - December:


Seguendo i tutorial di Tim ho decorato il background della Tag utilizzando lo Stencil Flourish, ho aggiunto un'occhiello con la Crop-a-dile ed ho fatto una cucitura tutto intorno...

Following Tim's tutorials I have decorated the background with the Flourish  'Layering Stencil', then added an eyelet with my Crop-a-dile and hand-stiched all around...


Dopodichè ho iniziato a pensare agli abbellimenti...ho preparato dei mini collage utilizzando il blocco di carte 12x12'' 'Destinations' , sempre di Tim Holtz...nel tappo ho incollato il '25', poi ho coperto il tutto con vernice cracklè ed una volta asciutto ho dato risalto alle crepe utilizzando i Distress Crayons, Walnut Stain intorno al bordo e Picket Fence nel mezzo.
Ho voluto dare un tocco Steampunk (ovviamente...Lol!) aggiungendo una lampadina, dei mini ingranaggi di metallo ed una mini chiave 'arrugginita' - facciamo finta che sia la 'chiave di Babbo Natale' che ne dite?- Anche per le campanelle ho voluto aggiungerne una 'rusty'!
Ed ora il pezzo forte...la scritta 'MERRY'. Neanche a dirlo, ovviamente non ho la Shadow-Press Station che Tim ha usato, quindi cercando di fare di necessità virtù, ho utilizzato le lettere ritagliate con le fustelle 'Thinlits - Alphanumeric'  di Tim Holtz per creare un effetto 'debossing' sul cartoncino a righe (blocco 12x12'' 'French Industrial') e poi con una penna per embossing ho creato l'ombra ed embossata con la polvere oro. Quasi uguale...ehm...(scusa Tim!)

Afterwards I started assembling the embellishments...I have prepared mini collages using Tim's 'Destinations' 12x12'' paper pad,,,in the bottle cap I have glued the '25', covered it with crackle  glaze and when dry I enhanced the cracks using Distress Crayons - Walnut Stain on the outside and Picket Fence in the middle.
I wanted to add a Steampunk touch (of course...Lol!) with a small lightbulb, mini metal gears and a rusty mini key - let's pretend it's 'Santa's key', shall we? - I also added a small rusty bell between the golden ones!
And now it's time for the main piece...the word 'MERRY'. It's quite useless to say that I do not have the Shadow-Press Station that Tim used in his Tag, so I have thought of the best way to achieve the same result...sort of...! I have used the die-cut letters from Tim Holtz 'Alphanumeric' Thinlits on a piece of cardstock from Tim's 12x12'' paper pad 'French Industrial' to re-create a 'debossed' effect and then with an embossing pen and embossing gold powder I have created the shadow. Almost the same...ehm...(Sorry Tim!)


E siamo arrivati anche alla fine di quest'ultima Tag...è stata una bella avventura...chissà cosa preparerà Tim per il prossimo anno??? Io non vedo l'ora...e voi?

So here we are, at the end of this last Tag...has been a great adventure...I wonder what Tim will come up with the next year? I really can't wait...what about you?

Kisses&Hugs!
Simo.

lunedì 21 novembre 2016

mercoledì 9 novembre 2016

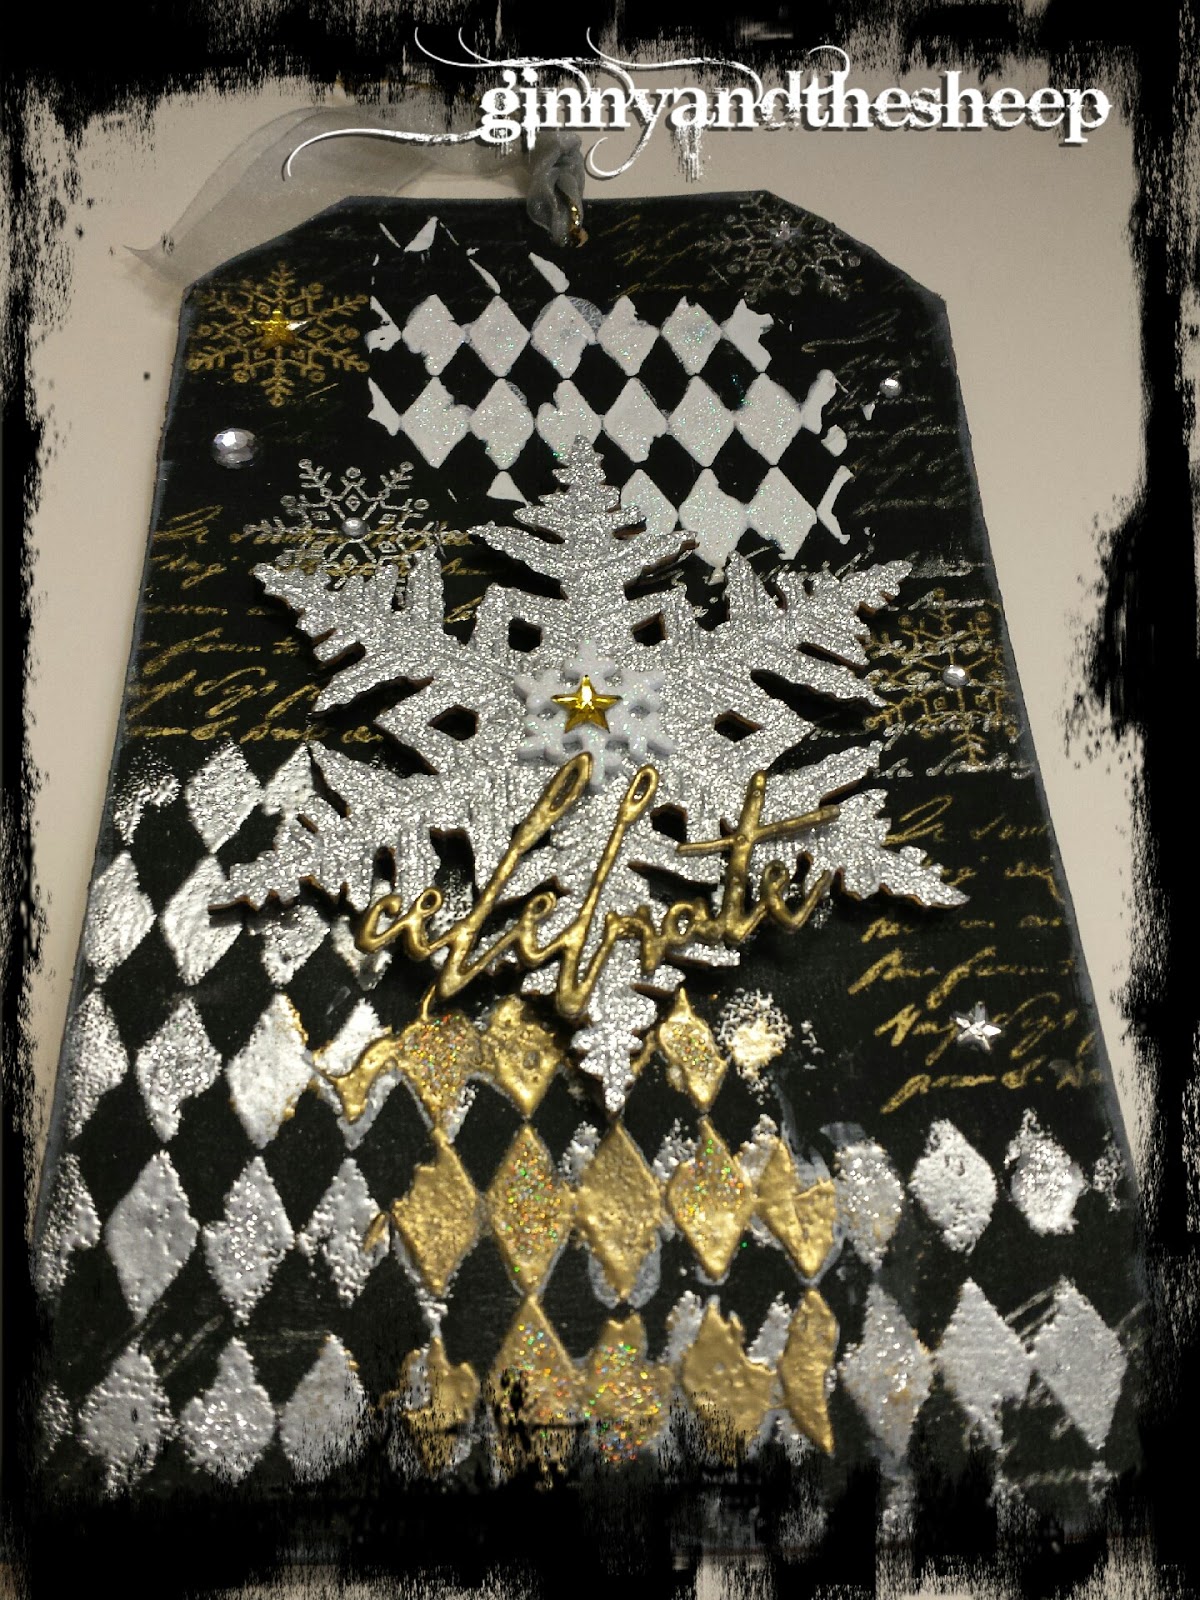
Shine Bright like a Diamond...


Ciao a tutti!!! Finalmente eccomi di ritorno con una bella sfida del LUNEDI di SIMON SAYS STAMP...tra impegni ed influenza ho saltato qualche settimana, ma ora sono di nuovo in carreggiata...
Il tema di questa settimana è...rullo di tamburi...'SHINE BRIGHT LIKE A DIAMOND' e niente, quando l'ho visto, nella mia testa l'ho letto cantando, sulle note della famosa canzone di Rihanna...ditemi che non sono l'unica...no eh...pazienza, sono senza speranza...Lol!!!
Comunque, dal momento che per questa sfida i prodotti 'di punta' erano quelli del nostro amato TIM HOLTZ, mi ci sono buttata a capofitto...e si...ne è uscito un lavoro particolarmente 'luccicoso'!!!

Hello everyone!!! Finally I'm back with another great MONDAY CHALLENGE over at SIMON SAYS STAMP Blog...I have missed few weekly challenges due to commitments and flu...lots of flu...but now I am back on track...
This week's challenge is...drum roll please...'SHINE BRIGHT LIKE A DIAMOND', and when I saw this, I couldn't help to sing Rihanna's refrain...please tell me it's not just me...no eh... ok I'm hopeless...Lol!!!
Anyhow, as the designer's products showcased are the ones of our beloved TIM HOLTZ, no less, I just jumped headfirst in this project and, yes...this tag is particularly 'Shiny'!!!

Ho steso  HEAVY BLACK GESSO di Prima sulla tag ed una volta asciutto ho usato il LAYERED STENCIL - HARLEQUIN di Tim Holtz ed un tampone per embossing e ho ricoperto la zona con della polvere per embossing argento. Poi sempre con lo stesso stencil ho steso della MODELING PASTE bianca, in alto ed in basso, sopra alla parte embossata, e qui, mentre la pasta era ancora umida, ho usato della polvere da embossing oro. Una volta asciugato con l'embosser, ho aggiunto della colla glitter (tipo Stickles) bianca, oro ed argento ed ho fatto asciugare bene.
Con dei tamponi oro ed argento ho fatto qualche timbrata qua e là prima con un timbro 'handwriting' e poi con un fiocco di neve, infine con un tampone bianco ho ripassato i bordi della tag.
Come punto focale ho usato un cartoncino glitterato argento e la fustella LAYERED SNOWFLAKE di Tim Holtz, che contiene anche un embossing folder per creare la texture sul fiocco di neve. Al centro ho incollato un piccolo fiocco bianco glitterato che avevo in casa da tempo ed ho incollato il tutto con del nastro biadesivo spessorato.
Poi ho ritagliato la scritta 'CELEBRATE' con le Thinlits 'HANDWRITTEN CELEBRATE' di Tim Holtz, l'ho embossata con la polvere oro e l'ho incollata al fiocco di neve.
Per aggiungere altro 'sberluccichìo' (non mi sono fatta mancare niente!) ho incollato alcuni strass...e la Tag è pronta e scintillante!  Sotto potete vedere i particolari...

I sealed the tag with HEAVY BLACK GESSO by Prima, and once dried I have used  the LAYERED STENCIL - HARLEQUIN by Tim Holtz with embossing ink and sprinkled  with silver embossing powder. With the same stencil added some WHITE MODELING PASTE, on the top and the bottom of the tag...on the bottom part I added gold embossing powder and used my heat tool to set it.
Then I added few touches with white, gold and silver glitter glue (like Stickles).
Using gold and silver ink pads I added also few stamps here and there, using first an 'handwriting' stamp and then a snowflake one; once dried I outlined the tag with a white ink pad.
As a focal point I have used a silver glittered cardstock and the LAYERED SNOWFLAKE  die by Tim Holtz, which contains also an embossing folder to add texture to the die-cut. On top of that I glued a small white glittery snowflake I had in my stash for ages, and then adhered to the tag using foam tape.
I have also die cut the word 'CELEBRATE' using 'HANDWRITTEN CELEBRATE' Thinlits by Tim Holtz, embossed it with gold embossing powder and glued it to the focal point.
In order to add a bit more of 'shine' (just to top it all!) I glued down few blings...and the Tag is ready and Shiny! You can see the details here below...

A sinistra ho usato il flash per far vedere meglio lo scintillìo...
On the left one I turned on the flash to catch the shine a bit better...


Ed anche con questa sfida siamo a posto...alla prossima!!!

And we are done with this one too...until next time!!!

Kisses&Hugs!
Simo.

martedì 18 ottobre 2016

Tim Holtz 12 Tags of 2016 - Remix...OCTOBER


Ciao a tutti! Eccomi a voi con la mia versione della Tag di Ottobre di Tim Holtz...
Come al solito ho cercato di ovviare alla mancanza degli elementi usati da Tim con quanto avevo a disposizione...in particolar modo il pezzo principale, cioè i 'Sizzix Monsters'...che non mi piacciono proprio...quindi ho utilizzato delle etichette 'particolari' (cioè delle 'printables' grazie a 'The Graphic Fairy' e 'Lia Griffith') per la base del collage, ed un dettaglio per il punto focale.

Hello everyone! Here's to you my take on the '12 Tags of 2016 - Remix Techniques' by Tim Holtz, October release... As usual I don't have all the elements used by Tim, so I had to do the best I could with my stash...in particular with the focal point of the tag, that is the 'Sizzix Monster'...sorry Tim...I don't like it...so I have used 'vintage' labels (that is digital printables, thanks to 'The Graphic Fairy' and to 'Lia Griffith') for my collage base, and a detail for the focal point.


Ho incollato le etichette, sovrapponendole un po' secondo le istruzioni di Tim, poi le ho ripassate con la vernice Crackle Glaze della DecoArt Media, stendendola con le dita. Una volta asciutta ho ripassato le crepe con i 'Distress Crayons' (uno dei miei ultimi acquisti...li adoro...)
Ho poi ritagliato tutto ciò che fuoriusciva dalla Tag, ritagliato ed invecchiato il teschio ed incollato un paio di rondelle per un tocco Steampunk!

I have glued down all the labels, following Tim steps, then I covered the all thing with DecoArt Media Crackle Glaze, using my finger. Once dried I enhanced all the cracks using 'Distress Crayons' (I have purchased them lately and I totally love them)
I cut off the excess, then fussy cut and distressed the skull and added few gears for a Steampunk touch!


E con questo vi saluto...alla prossima!

And that's that..'till next time!

Kisses&Hugs!
Simo.

martedì 11 ottobre 2016

EXPLORE THE WORLD...


Ciao a tutti! In attesa che arrivi Giovedì e, con esso la Fiera Abilmente a Vicenza, stempero un po' l'agitazione tenendomi occupata, e cosa c'è di meglio di una pagina di Art Journal per rilassarsi?
Ecco quindi la mia new entry per la sfida del Lunedì di SIMON SAYS STAMP...EXPLORE THE WORLD!
Non potevo chiedere di meglio... tema perfetto per usare alcuni nuovi acquisti...

Hello everyone! Only two days left to Abilmente Exhibition in Vicenza, where I will be teaching few classes, and I really needed something to calm me down a bit...and what's better than working on my Art Journal?
So here's to you my entry to the new Monday Challenge, over at SIMON SAYS STAMP...EXPLORE THE WORLD!
The perfect theme and excuse for me to use some of the new goodies I have purchased lately...

Ho iniziato con uno strato di Gesso bianco, poi ho incollato un pezzo di 'Tissue Wrap - Postale' di Tim Holtz. Ho coperto qualche area con del gesso bianco ed alcune zone con Gesso trasparente, poi ho usato i Gelatos della Faber-Castell per creare lo sfondo, sfumandoli con l'aiuto di una salvietta umidificata.
Poi ho appoggiato lo stencil di Tim Holtz 'Industrial' ed ho tolto il colore con la salvietta umidificata in corrispondenza delle parole 'LOST' e 'FOUND'. Ho anche utilizzato uno stencil con alfabeto che avevo in casa da tempo immemore per creare la parola 'AND'.

I painted the page with White Gesso, then I glued down a piece of Tim Holtz 'Tissue Wrap - Postale', and covered here and there with white gesso and few areas with clear gesso. I have used Faber-Castell Gelatos for the background, mixing them together with a baby wipe.
I also used Tim Holtz 'Industrial' Stencil, erasing the color with the baby wipe to let the words 'LOST' and 'FOUND' emerge from the background. With another stencil I used the same method for the word 'AND'.


Poi ho iniziato a timbrare vari soggetti con inchiostro marrone ed inchiostro nero, ed ho posizionato la fustellata del Globo, ovviamente di Tim Holtz! Prima però ho utilizzato il negativo della fustellata come stencil per creare l'effetto dell'acqua con i Distress Inks Peacock Feathers, Mermaid Lagoon e Salty Ocean. Ho colorato con i Distress Inks anche il Globo, usando Vintage Photo, Peeled Paint, Walnut Stain e Black Soot e ne ho incollato i bordi in modo che il tutto risulti leggermente rialzato...ma non ero pienamente soddisfatta del resto della pagina...troppe timbrate!
Quindi, per rimarcare il fatto che nel mixed media e nell'art journaling non esiste errore...ho coperto con della Pasta Modellante le zone che non mi piacevano, spostandola con le dita e grattandola con la spatola, per creare del movimento. Una volta asciutta l'ho colorata con il colore acrilico Soft Black della DecoArt serie Americana, sempre stendendolo con le dita ( si...quando lavoro a queste cose le mie mani sono ridotte in uno stato pietoso...Lol!). Poi con una salviettina ho iniziato a togliere il colore in eccesso qua e là, creando questo effetto 'rovinato' che mi piace molto!

Afterwards I started stamping different subjects with brown and black ink, and decided where to put my focal point, the Globe die cut, obviously a Tim Holtz thinlit die! When satisfied, I have used the negative of the die cut as a stencil to create some sort of 'water' using Distress Inks Peacock Feathers, Mermaid Lagoon and Salty Ocean; I also painted the Globe using Vintage Photo, Peeled Paint, Walnut Stain and Black Soot and glued down only around the border...still...I wasn't satisfied with the rest of the page...too many stamped images!
So, just to point out that in mixed media and art journaling there is no such thing as 'a mistake'...I covered it up with Modeling Paste (or Texture Paste), streching it with my fingers and scraping it with my spatula, to make even more texture. Once dried I painted it with DecoArt Americana acrylic Soft Black, always with my fingers (yes...when I'm up to these things my hands are horrific to behold...Lol!) Then, with a baby wipe I took off the excess here and there, creating this 'scratchy' effect that I really love!


Ho scurito i bordi con il Distress Black Soot, ho aggiunto delle scritte fustellate con le thinlits della serie 'Journey' di Tim Holtz ed infine ho usato del colore bianco molto diluito ed uno spazzolino da denti rovinato per creare gli spruzzi.

I deepened the border using Distress Ink Black Soot, added die cut words from Tim Holtz  'Journey' Thinlits and finally spattered  thinned down white acrylic paint using a very old tooth brush.


E con questo ci salutiamo...vi ricordo che giovedì sul blog del Salotto Creativo ART & ART uscirà il mio tutorial per il tema del mese...'Foglie d'Autunno'...e se siete dalle parti di Vicenza, per la Fiera Abilmente mi troverete sempre Giovedì 13 allo Stand n.213 di PEZZE e COLORI, nel Padiglione 1 ...passate a salutarci!

That's all folks! See you soon...

Kisses&Hugs!
Simo.

venerdì 26 agosto 2016

A 'Fishy' Challenge...


Ciao a tutti...dopo un pò di latitanza, rieccomi su queste pagine...
Purtroppo questa è stata una settimana infelice per la nostra Italia, colpita dal sisma che ha causato tanta distruzione...ancora una volta ci rendiamo conto di quanto siamo impotenti di fronte alla violenza di madre Natura!
Un pensiero ed un abbraccio a tutti coloro che sono rimasti coinvolti in questa terribile tragedia...
Sembra un pò futile parlare di creatività e sfide settimanali, ma proprio per 'scappare' dalle notizie dei vari TG, mi sono buttata 'a pesce' in questa nuova SFIDA DEL LUNEDI' sul BLOG DI SIMON SAYS STAMP...'GO FISH'!

Hello everyone...after some time here I am once again writing on these pages...
Unfortunately this has been an awful week for our Italy, deeply wounded by the terrible earthquake which caused  death and distruction in the Centre of our Country...once again we realize how small and powerless we are against the violence of Mother Nature!
Thoughts and hugs to everyone involved in this terrible tragedy...
Sounds a little futile speaking now of crafting and such, but I wanted to escape the news on TV somehow, so I jumped on the latest MONDAY CHALLENGE over at SIMON SAYS STAMP BLOG...'GO FISH'!


Ultimamente ho la fissa per le barchette di carta...che ci volete fare...capita! Lol!
Quindi stavolta ho deciso di farla 3D, usando della carta patterned che avevo da tempo. Ho ritagliato delle 'onde' da cartoncino blu, disegnato e ritagliato il pesce da un cartoncino di recupero e ricoperto con washi tape. Ho usato del washi anche per le varie bandierine.

Lately I'm quite obsessed with paper boats...what can I say...it happens! Lol!
This time I decided for a 3D boat, using patterned paper I had in my stash. Fussy-cut waves from blue cardstock, sketched and cut out the fish and then covered it with washi tape. Used washi also for the banners.

Volevo dare uno scopo a questa barchetta con il suo 'Big Fish', e quindi con l'aggiunta del filo metallico la posso usare come porta-foto...

I wanted to give a useful purpose to this tiny boat and it's 'Big Fish', so added some wire and now I can use it as a photo stand...


E con questo è tutto...alla prossima!

That's all folks...until next time!

Kisses&Hugs!!!
Simo.

martedì 19 luglio 2016

SSS Monday Challenge...Let's Sail Away...

Ebbene si...non c'è niente di meglio di una bella sfida sul Blog di Simon Says Stamp per ricominciare a 'sporcarsi le mani'!!! Ahhh quanto mi siete mancati!!!!
Il tema della settimana è 'Nautical/By the Sea', giusto per restare in tema vancaze, quindi perfetto per continuare con le mie Tags...

Well...Yes...nothing is better than a good ol' challenge over at Simon Says Stamp Blog to get back into action!!! Oh guys...how much I have missed you!!!
This week's theme is 'Nautical/By the Sea', talking about holidays all over again, hence perfect to get my Tags going...


Ecco come ho preparato questa Tag: per il background ho usato gesso bianco, acrilico spray e lo stencil di Tim Holtz 'Rays' con il Distress ink pad 'Peacock Feathers'.
Con il Distress ink pad 'Black Soot' ho ripassato i contorni della Tag ed ho stampato la parola 'Sail' con l'alfabeto di 'Stampendous - Vintage Uppercase' ed inchiostro nero. Ho scritto la parola 'Away' con un pennarello nero della Faber-Castell.
Su di un cartoncino ho disegnato una barchetta di carta, ho ripassato i contorni ed ho ombreggiato con i pastelli 'Warm Grey IV' e 'Black Soft' della serie Polychromos della Faber-Castell. Poi ho ritagliato la sagoma in una pagina di libro ed ho incollato i pezzi sulla barca. Sul retro ho incollato uno stuzzicadenti dipinto con acrilico bianco e la bandierina fatta con un pò di washi tape.
Molto semplice...

Here's how I made thig Tag: for the background I used white gesso, acrylic spray and Tim Holtz stencil 'Rays' with Distress  ink pad 'Peacock Feathers'.
With Black Soot I distressed the borders all around, stamped the word 'Sail' using 'Stampendous - Vintage Uppercase' alphas and black archival ink. I wrote the word 'Away' with a black Pitt artist pen by Faber-Castell.
I have drawn a little paper boat on white cardstock, painted the shadows with 'Warm Grey IV' and 'Black Soft' pencils  by Faber-Castell Polychromos series, drawn and fussy-cut the boat on a book page and glued the pieces. On the back of the boat I have glued a toothpick, previously painted with white acrylic and used washi tape for the little flag.
Very simple...


Questo è tutto...Alla prossima volta...o sfida!!!

That's all...until next time...or challenge!!!

Kisses&Hugs!
Simo.

martedì 14 giugno 2016

TRAVEL WITH ME...SSS Monday Challenge!


Ciao! Eccomi con la sfida del Lunedì in casa di SIMON SAYS STAMP!
Il nuovo tema è 'WORLD TRAVELER'...ok è ufficiale...abbiamo tutti voglia di andare in ferie!!!
Per questa sfida ho deciso di preparare una card un pò particolare, che nasconde una sorpresa...

Hello! Here I am with the Monday Challenge over SIMON SAYS STAMP Blog!
The new theme is ' WORLD TRAVELER'...ok it's official...we all want holidays!!!
For this challenge I have decided for a special card, hiding a surprise...


Ta-daa...una Pop-Up card...mi piacciono tantissimo!

Ta-daa...a Pop-Up card...how I love them!

Per l'esterno ho usato la fustella  Large di Tim Holtz 'Vintage Valise', per i manici e le fibbie ho usato del sughero distressato con i Distress Ink pads Walnut Stain e Black Soot, poi ho attaccato la fustellata su cartone di recupero, per dare più stabilità al tutto. 
Per l'interno ho utilizzato un timbro di una mini mongolfiera che ho colorato con pastelli acquarellabili della Faber-Castell. Ho disegnato delle nuvolette su una pagina di un libro precedentemente sporcata con gesso bianco, le ho ripassate con una Pitt artist pen nera sempre della Faber-Castell, le ho leggermente colorate sempre con i pastelli acquarellabili. Poi le ho ritagliate ed ho sporcato i bordi con il Black Soot.
Per il sole ho usato una fustellata da un set  di thinlits della Sizzix (You+Me).
Ho assemblato tutto ed ho mattato con cartoncino nero, e ritagliato seguendo i bordi.
Ho incollato alla card, ho aggiunto un banner con una scritta ed aggiunto un'altra timbrata.

For the outside of the card I have used the 'Vintage Valise' Large Die by Tim Holtz, using cork for the handles and such, distressed with Distress Ink pads Walnut Stain and Black Soot, then glued the die-cut on a recycled cardboard, for more sturdiness.
For the inside I used a mini stamp of a hot balloon that I have painted with Faber-Castell watercolour pencils. I have drawn the clouds over a gessoed book page, outlined them with a Fabel-Castell Pitt artist pen and slightly coloured them with watercolour pencils. Then I cut them out and distressed with Black Soot.
For the sun I have used a die-cut from the Sizzix thinlits set You+Me.
Glued all together with a black cardstock, and cut it out.
Taped down to the card, added a hand-written sign cut as a banner, and another stamp.


E questo è quanto...alla prossima!

That's it...until next time!

Kisses&Hugs!
Simo.

lunedì 30 maggio 2016

It's MONDAY...!

Si lo so...di solito non si accoglie il lunedì con molto entusiasmo, MA...c'è la Sfida del LUNEDI nel Blog di Simon Says Stamp,,,ed incredibile...riesco a postare il lavoro proprio il giorno di uscita della sfida!!!
Il nuovo tema è 'MONOCHROME'...e mi ha subito incuriosito, così ho iniziato a sperimentare nel mio Art Journal, e questo è il risultato...

I know, I know, usually you don't cheer up on Mondays, BUT...it's MONDAY Challenge Time over Simon Says Stamp Blog...and it's incredible...but I have managed to post my take on the challenge right on time!!!
The new theme is 'MONOCHROME'...and I just got hooked, so I started to play in my Art Journal, and this is what I came up with...
Ho scelto il colore NERO, e questi sono i materiali che ho usato:
Gesso bianco
Stazon Jet Black
colore acrilico Lamp Black DecoArt Americana
Distress Ink mini pad Black Soot
Tombow Dual Brush Pen N15 Black
pastello acquarellabile  nero della Faber-Castell
PITT artist pen Black Faber-Castell
Penna gel nera
Penna gel bianca
Stencil Harlequin Tim Holtz
Stencil con bolle
Pasta Modellabile bianca
Top Boss embossing pad Clearsnap
Embossing powder Midnight Black Stampendous
Vintage Uppercase alfabeto Stampendous

I choose BLACK colour, and these are the materials used:
White Gesso
Stazon Jet Black
Acrylic paint Lamp Black DecoArt Americana
Distress Ink mini pad Black Soot
Tombow Dual Brush Pen N15 Black
Black watercolour pencil Faber-Castell
Black PITT artist pen Faber-Castell
Black gel pen
White gel pen
Tim Holtz Harlequin Stencil
Bubbles stencil 
White Modeling Paste
Top Boss embossing pad Clearsnap
Embossing powder Midnight Black Stampendous
Vintage Uppercase alpha stamp Stampendous

Ho steso del gesso sulla pagina ed ho timbrato con lo Stazon Jet Black su carta velina (tissue paper). Ho incollato la carta e poi ho aggiunto dei decori con lo stencil Harlequin ed il Distress ink Black Soot. Ho steso del Black Soot ed appoggiando lo stencil ho tolto il colore con una salvietta umidificata. Poi ho usato lo stencil con le bolle ed il colore della DecoArt Americana Lamp Black per i cerchi più scuri, mentre la spugnetta quasi scarica ed il Black Soot per le bolle più piccole.
Ho aggiunto un paio di bolle con la pasta modellabile bianca ed ho fatto il contorno con una penna gel nera. Con una penna gel bianca ho scritto nelle bolle più scure.
Con il pennarello Tombow nero ho ripassato la farfalla e con il pastello acquarellabile nero ho ombreggiato l'immagine. Ho poi ripassato i contorni con una PITT pen nera.
Ho embossato le lettere FLY usando la polvere Midnight Black di Stampendous, ed ho usato la stessa polvere qua e là sulla pagina.
Infine ho 'distressato' i bordi della pagina con il Black Soot ed aggiunto del washi tape.

I gessoed the page, than stamped on tissue paper the image using Jet Black Stazon. Glued that down and added stenciling using Harlequin stencil and Distress Ink mini pad Black Soot.
After that added some distress ink on the page and used the stencil and a baby wipe to lift the colour. Used a bubbles stencil and DecoArt Americana Lamp Black acrylic paint, for darker bubbles while for the others I used Black Soot again, but without reloading the ink on the applicator.
Added few touches of white modeling paste and then outlined using black gel pen. The words are written with white gel pen
With the Black Tombow Dual Brush Pen I added details on the butterfly, then with a watercolour pencil I added some shadow. I outlined the image using a black PITT artist pen.
I have embossed the word FLY  and sprinkled the page with Midnight Black embossing powder.
Final touch, I distressed the borders of the page with Black Soot Distress Ink pad, and added some washi tape.

E' tutto...usare un solo colore per un effetto monocromatico è stato molto divertente!
Alla prossima...

That's it...using one colour for a monochromatic effect has been fun!
Until next time...

Kisses&Hugs!
Simo.

sabato 28 maggio 2016

On wednesday...Anything goes!

Ciao, anche questa settimana ho preparato un progetto per la sfida del Mercoledì sul Blog di Simon Says Stamp!
Il tema della sfida è 'ANYTHING GOES' cioè va bene tutto...sono stati usati i prodotti di Technique Tuesday, e dal momento che ho un timbro per il journaling che adoro,  ho deciso di usare quello.
Avevo pensato ad una cosa ed ovviamente è uscito tutt'altro!!! Lol!

Hello, this week  I'm taking part in  the Wednesday Challenge over Simon Says Stamp Blog!
The theme is 'ANYTHING GOES' and they are showcasing Technique Tuesday products. Since I have a journaling stamp that I love, I went for this. I had a project in mind...and the result, obviously, is a completely different thing!!! Lol!

La prossima settimana sarà il mio (anzi nostro) Anniversario di Matrimonio, così ho deciso di fare un mini layout utilizzando una foto che ci è stata fatta da amici, all'uscita dalla chiesa. Noi due sotto una pioggia di riso e pasta (si avete letto bene...ci hanno lanciato delle penne!).
Ho fustellato una 'polaroid' con una fustella di 'Paper Smoochies' ed ho ritagliato la scritta con una thinlits Sizzix del set 'You+Me'.
Ho usato un foglio 6x6 della serie Reflections di Echo Park come base, ho incollato la foto con nastro biadesivo spessorato, ho aggiunto 2 tickets da 'Adage Tickets' Idea-ology di Tim Holtz, rosa e petali sono stati ritagliati con la Flower Layers and Leaves Die di Sizzix, ho timbrato su cartoncino spesso usando il timbro 'This Day' di Technique Tuesday con lo Staz-on Timber Brown e poi l'ho ritagliato usando dei punch.
Ho ritagliato una targhetta ed ho timbrato con l'inchiostro Black Hero Hues della Hero Arts, la scritta 'Remember' da un set di Heidi Swapp ed un alfabeto Artemio. Poi ho ritagliato la scritta 'Moment' con una fustella Metaliks di Kesi'art e l'ho embossata con la polvere Midnight Black di Stampendous. Ho distressato tutto con il Distress Ink pad Vintage Photo ,
Solo che non ero completamente soddisfatta, quindi mi è venuta l'idea di creare un'altra Shadow Box (la prima la potete vedere qui...).
Dopo aver fatto vari calcoli e preso un tot di misure, finalmente sono riuscita a fare una shadow box che si adatta perfettamente al layout preparato. Ho utilizzato del cartoncino nero piuttosto spesso, poi ho coperto il bordo con del cartoncino bianco su cui ho usato il timbro 'Dream Text' di Stampendous (quanto mi piace questo timbro!!!) timbrato sempre con il nero di Hero Arts. Poi ho distressato la pagina con i Distress Ink pad 'Antique Linen' e 'Vintage Photo', spruzzato dell'acqua e fatto asciugare. Poi ho ritagliato le varie strisce, le ho distressate con il Distress Ink pad 'Black Soot' e le ho incollate con del biadesivo. Ho aggiunto un'altro ticket, una rosa e delle foglioline ritagliate in una pagina di libro.
Adesso sono soddisfatta del mio lavoro...e lo è anche la mia Dolce Metà!!!

Next week will be my (better ours) Wedding Anniversary, so I decided to do a mini layout using an old photo that some friends took when we were outside the church. The two of us under a storm of rice and pasta (yes you got it right...they tossed pasta also, 'penne' by the way which have pointy ends!)
I die cut a polaroid frame using a Paper Smoochies die set, and the writings using Sizzix thinlits set 'You+Me', I used a 6x6 designer paper from the 'Reflections' pad by Echo Park as a base, then I added the photo with foam tape, stapled two tickets from the 'Adage Tickets' Ideo-logy by Tim Holtz. The rose and the leaves have been die cut with the Sizzix Flower Layers and Leaves die. 
I Stamped onto thick cardstock using Brown Timber Staz-on ink pad and the 'This Day' stamp by Technique Tuesday and punched it out.
Punched a tiny tag, stamped a sentiment using Black Hero Hues ink pad by Hero Arts and Heidi Swapp stamp sets and Artemio alphas. Die cut the word 'Moment' on cardstock using a Metaliks die by Kesi'art, embossed it with Midnight Black powder by Stampendous and distressed everything using 'Vintage Photo' Distress Ink pad.
But I wasn't completely satisfied, so I came up with the idea of another Shadow Box (you can see the first one here...)
After taking all the measurements needed, I've finally made the ' perfect fit' shadow box for my layout. I've used black thick cardstock, then I have covered the front with a custom 'paper'. I have stamped on white cardstock using the Black  Hero Hues ink pad by Hero Arts and the 'Dream Text' cling stamp by Stampendous (how I love this stamp!), Then I distressed the page using Antique Linen and Vintage Photo Distress Ink pads, mist it with water and let it dry.
Afterwards I have cut 4 strips, distressed them with Black Soot Distress Ink pad, and taped them down. Added a rose, leaves and another ticket.
Now I am VERY satisfied with the result...and the same is my Sweet Hubby!!!


Questo è tutto! Buon Week-End!!!
That's all! Have a great Week-End!!!

Kisses&Hugs!
Simo.