Visualizzazione post con etichetta card. Mostra tutti i post

venerdì 1 giugno 2018

A Masculine card...


Ciao a tutti! Avete presente quei rari momenti in cui tutto si incastra alla perfezione e riesci miracolosamente a portare a termine tutti gli impegni che ti eri prefissata? Ecco...oggi è stata una giornata così...tranquilli eh...non capiterà più e mi sono giocata il bonus fino alla fine dell'anno...ma mi godo 'l'attimo perfetto'...e la soddisfazione di essere riuscita a preparare la card per mio marito per il giorno del nostro Anniversario...e nel contempo a partecipare alle Sfide della settimana di SIMON SAYS STAMP! Che ci volete fare...la felicità sta nelle piccole cose...

Hello everyone! Have you ever had those rare moments when everything falls perfectly into its proper place and you manage to meet all the deadlines and commitments? Well.. today is one of those days...dont't worry now...won't happen again..at least till the end of this year...but right now...I'm enjoying 'the perfect moment'...and the fact that I have been able to make a card for my Husband for our Wedding Anniversary....and to take part to the weekly Challenges at SIMON SAYS STAMP! What can I say...happiness is in the small things...


Due parole sulla card...sul cartoncino per Alcohol Inks ho usato la mia tecnica preferita con Distress Oxides e Distress Micro Glaze...prima di passare la 'cera' ho timbrato con lo StazOn Timber Brown  usando i set 'Dapper' e 'Theories' di Tim Holtz, e ripassato i bordi con il Distress Ink Ground Espresso. Ho aggiunto dei doodles e fatto cadere delle gocce con l'Uniposca Bianco.
Ho tagliato a misura un pezzo di carta patterned dal set 12x12 'Destinations' di Tim Holtz, poi ho praticato dei tagli per far passare il cartoncino decorato, ed ho incollato con biadesivo, aggiungendo anche dei punti di spillatrice.  Sulla 'banda' ho attaccato dei pezzi di Design tape 'French' sempre di di Tim Holtz, poi ho incollato una Paper Doll ed ho aggiunto una scritta fatta con la Dymo.
Per finire un tocco 'Steampunk' con un piccolo ingranaggio.


Two words on the card...I have used one of my favourite techniques using Alcohol inks cardstock, Distress Oxide Inks and Distress Micro Glaze. Before applying the Glaze I have stamped few images from Tim Holtz  'Dapper' and  'Theories' sets using StazOn Timber Brown, and Distress ink Ground Espresso on the edges. I added splatters and doodles with a white Posca pen.
Cut to measure a piece of patterned paper from Tim Holtz 12x12 set 'Destinations', then cut two slits to let the decorated cardstock slip through and secured it with double sided tape and my stapler.
Then added Tim's 'French' Design tape and a Paper Doll. The sentiment is made with my Dymo printer. As a final 'Steampunk' touch I glued a little gear.


Presento questa card per le seguenti sfide/ I submit this card to the following Challenges:

- SIMON SAYS STAMP MONDAY CHALLENGE: MASCULINE

- SIMON SAYS STAMP WEDNESDAY CHALLENGE: ANYTHING GOES

E con questo è tutto...se volete ci vediamo di nuovo su queste pagine Domenica...per un tutorial particolare...

That's it...if you feel like, I will wait for you here this Sunday...for a special tutorial...

Kisses&Hugs!
Simo.


EDIT: Felicissima che la card sia stata inserita nel DESIGNER SPOTLIGHT sul Blog di SIMON SAY STAMP!!! 
So happy and honoured that the card made it to the DESIGNER SPOTLIGHT over at SIMON SAY STAMP MONDAY CHALLENGE Blog!!! Thank you so much guys!!!

lunedì 9 aprile 2018

Use your Wings...


Ciao a tutti! Eccomi qui dopo un po' di latitanza, per mostrarvi questa card un po' particolare...
Preparata recentemente per una DT call, ma mai pubblicata! Stavo scrivendo un tutorial quando è uscita la nuova Sfida del LUNEDI di SIMON SAYS STAMP...MYTHOLOGY/INSPIRED BY A STORY, ed ho pensato che fosse assolutamente perfetta per rappresentare uno dei miti più famosi di tutta la Mitologia Greca: Il volo di ICARO.
Certo il mio Icaro non è un ragazzino...me lo immagino più adulto, piuttosto che un giovane troppo preso dal suo volo per ascoltare le raccomandazioni  e destinato ad una rovinosa caduta.
Con la saggezza dell'età e dell'esperienza il nostro nuovo Icaro può vivere la sua vita in modo coraggioso, ed usare le sue ali per volare alto.

Hello everyone! Here I am, after some MIA time, to show you this slightly different card...
I made it recently for a DT call, but never published! I was writing a tutorial about it when the new MONDAY Challenge over at SIMON SAYS STAMP Blog came out...MYTHOLOGY/INSPIRED BY A STORY, and I thought it could be perfect to represent one of most famous Greek Myths: the flight of ICARUS.
Well my Icarus is not exactly a young boy...I like to think about him more as a grown-up then a boy too elated by his flight to listen to the warnings and destined to his fall.
With the wisdom of the age and experience our modern Icarus can live his life bravely and use his wings to fly high.


Ed ora ecco gli steps... su un cartoncino pesante per acquerello ho aggiunto della pasta modellabile con uno stencil, poi ho fatto cadere delle gocce di InkExtreme 'Smeraldo' di TommyArt e spruzzato con acqua per far correre il colore. Asciugato poi fatto cadere i Rainbow Colors Duo 'Yellow Amber' e 'Turquoise' della 13Arts, che sono pigmenti in polvere, attivati con acqua ed asciugato di nuovo...

Now for the step-by-step...on a heavy watercolour cardstock I added some modeling paste with a stencil, then flicked few drops of 'Emerald' InkExtreme by TommiArt and spritzed with water to make the colour run. Dried very well the added 13Arts powdered watercolour dyes Rainbow Colors 'Yellow Amber' and 'Turquoise', activated with water and then dried again...


 Nello step successivo ho aggiunto i Distress Oxides, schiacciando il pad direttamente sul craft mat, spruzzando con acqua e raccogliendo il colore con il cartoncino.
Prima ho usato il Peacock Feathers, poi il Wild Honey...ricordate di asciugare tra un colore e l'altro.

In the next step I have used Distress Oxide Inks, 'smooshing' the pad directly on the craft mat, spritzing with water and dabbing the cardstock into the colour.
First I have used Peacock Feathers, then Wild Honey...remember to dry before adding the next colour.


Una volta soddisfatta della tonalità, ho aggiunto delle timbrate con inchiostro archival nero...

Once pleased with the outcome, I added few stamps here and there using a black archival ink...


Ho ritagliato a misura, timbrato un paio di ali che ho colorato con una Posca pen bianca e poi aggiunto delle cuciture decorative. Ho timbrato delle piume su un foglio di pellicola di plastica 'Shrinkie' e colorate con i Distress Markers Peacock Feathers, Mermaid Lagoon e Hickory Smoke, poi le ho ritagliate e 'rimpicciolite' con l'embosser.
Ho poi utilizzato le fustelle 'Movers & Shapers - Mini Bird & Cage set' di Sizzix/Tim Holtz Alterations, ho ritagliato delle sbarre dalla gabbietta ed 'arrugginita' con le Rust Paste di Prima/Finnabair, sull'uccellino ho passato le cere di Prima/Finnabair Opal Magic 'Turquoise Satin' e Metallique 'Vintage Gold'.
Ho assemblato il tutto partendo da una Paper Doll di Tim Holtz, ho aggiunto il resto e per finire 2  Small Talk Stickers sempre della linea Idea-ology di Tim Holtz.
Ho incollato il tutto su di un cartoncino nero piegato a formare una card.

Cut to measure, stamped a pair of wings and painted them with a white Posca pen, then added decorative stiching. I have stamped some feathers on a sheet of white 'Shrinkie' plastic, added colour with Distress Markers Peacock Feathers, Mermaid Lagoon and Hickory Smoke, then fussy cut and shrinked with a heat tool.
Used Sizzix/Tim Holtz Alterations 'Movers & Shapers - Mini Bird and Cage set' dies, cut out the bars from the cage and added a bit of rust with Prima/Finnabair Rust Paste, while on the birdie I added touches of Prima/Finnabair Art Alchemy waxes - Opal Magic 'Turquoise Satin' and Metallique 'Vitage Gold'.
Assembled everything...added an Idea-ology Paper Doll and a couple of Small Talk Stickers, always by Tim Holtz.
Attached to a piece of black cardstock scored in the middle to make a card.


Ho anche aggiunto un cartoncino bianco all'interno, timbrando un sentiment dal set ETS05 di PaperArtsy, con il Distress Oxide Peacock Feather.

Also added a piece of white cardstock to the inside, stamping a sentiment from PaperArtsy set ETS05, using Distress Oxide Ink Peacock Feather.


E con questo siamo arrivati alla fine...Vi ringrazio per essere passati di qua! Ci vediamo alla prossima!

That's it...Thank you for stopping by...See you next time!

Kisses&Hugs!
Simo.

EDIT:
Sono felicissima di essere stata scelta per il DESIGNER SPOTLIGHT con questa card...Grazie!!!
I am so happy to be featured in the DESIGNER SPOTLIGHT with this card...Thanks so much!!!


domenica 4 febbraio 2018

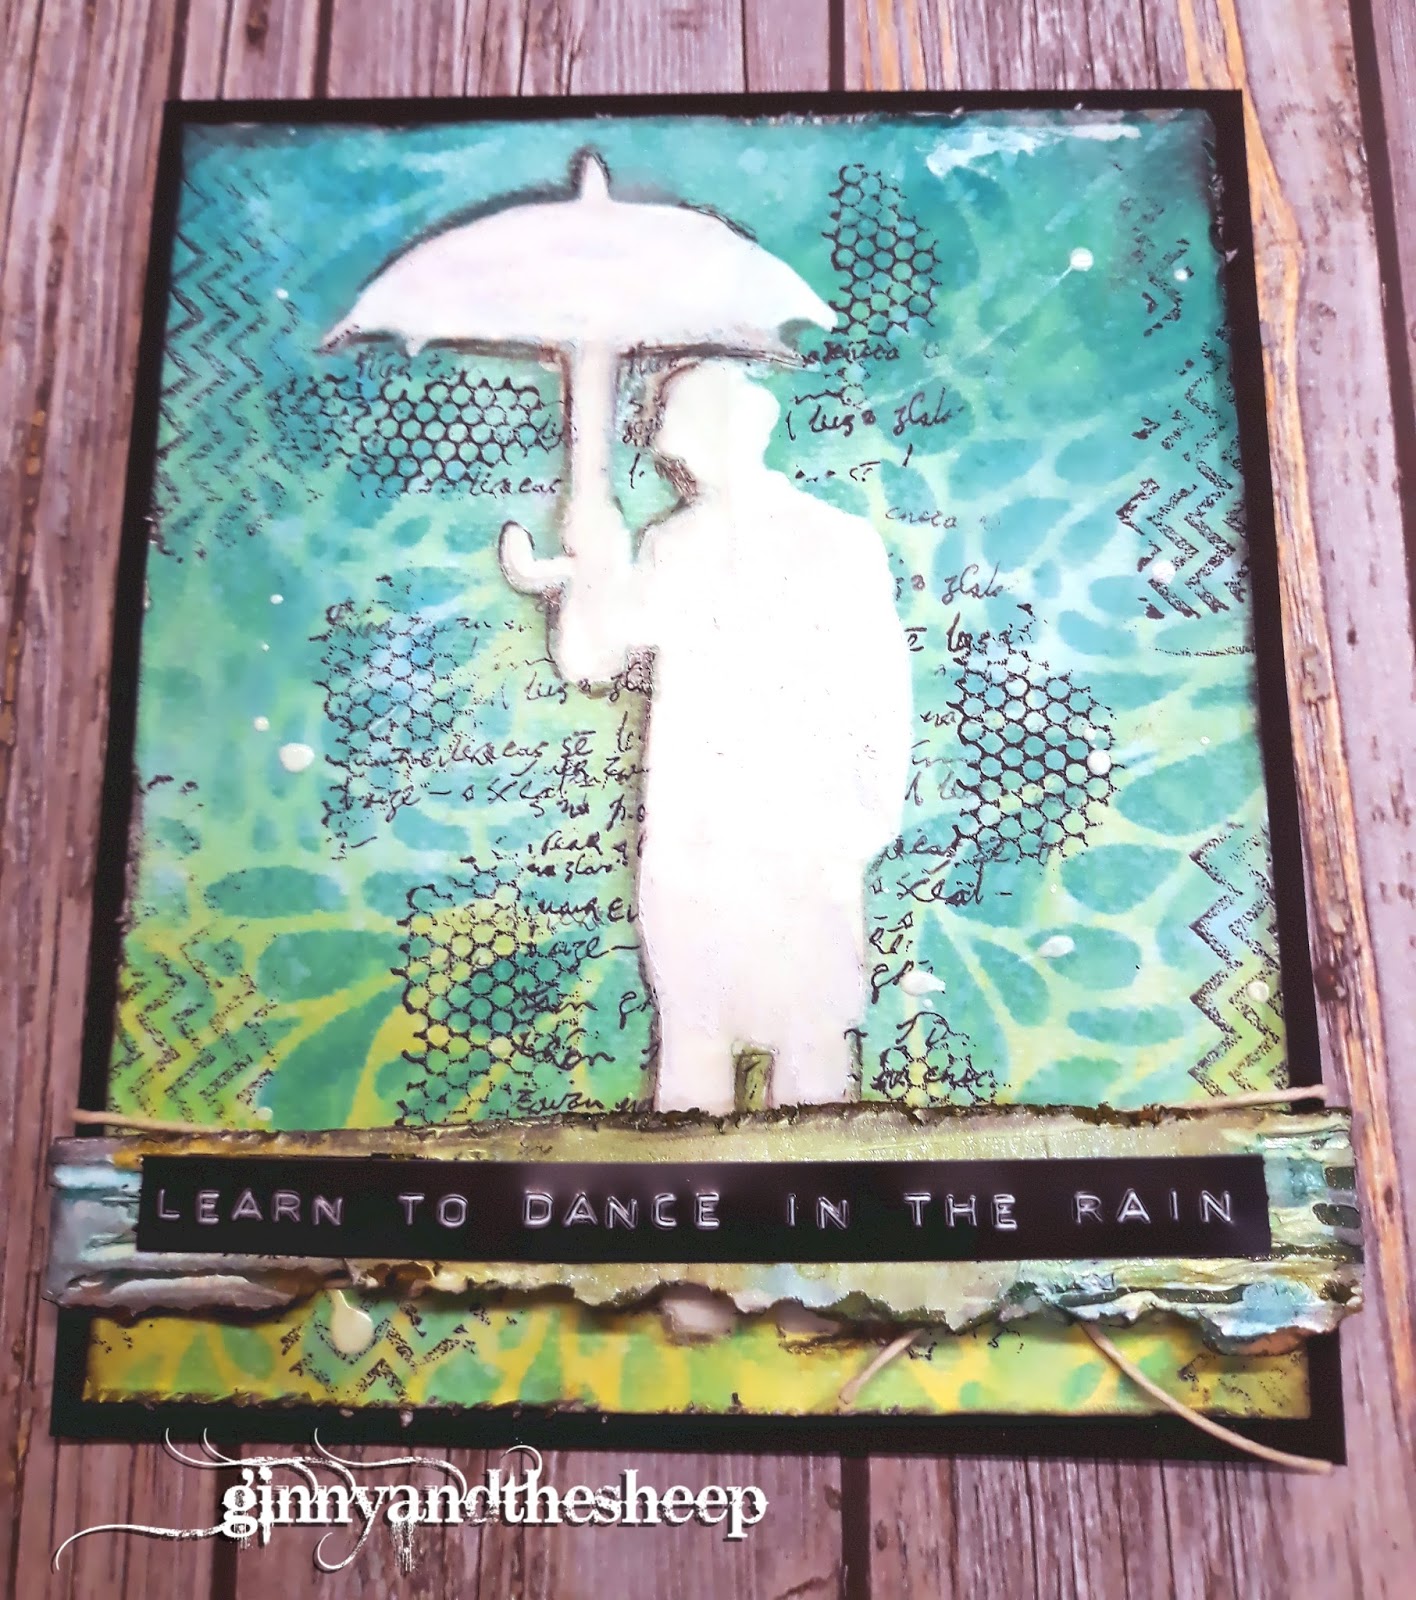
Learn to Dance in the Rain...


Ciao a tutti e benvenuti su queste pagine...Siamo già a Febbraio...io trovo incredibile quanto passi veloce il tempo...specie se si hanno delle scadenze...aiutooo....Lol!
Comunque eccoci al progetto di oggi: si tratta di una card piuttosto semplice, in realtà...

Hello everyone and welcome once again on my blog...We are in February already...I think it is quite overwhelming how fast time runs forward...especially if you have deadlines...heeelp...Lol!
Anyhow...this is today's project: it's a pretty simple card...


Ho utilizzato la fustella 'Umbrella Man' di Tim Holtz (il mio tesssoro...ha ha ha...non vi dico da quanto tempo ho fatto la corte a questa fustella...) per crearmi uno stencil, che ho utilizzato con del gesso bianco per creare un punto focale che creasse resistenza ai colori che sarei andata ad aggiungere in un secondo tempo. Dopo aver asciugato bene ho iniziato a creare lo sfondo con i Distress Oxides Twisted Citron, Cracked Pistachio e Peacock Feathers, ripulendo con una salvietta umida il mio uomo con l'ombrello...ho poi utilizzato lo Stencil Splash di Tim Holtz con il D.O. Peacock Feathers e poi l'ho appoggiato di nuovo e ci sono passata sopra con la salvietta per togliere il colore dello sfondo qua e là. Poi ho fatto cadere delle goccie di acqua e tamponato con un pezzo di carta ed infine ho utilizzato la fustella rimasta dell'Umbrella Man come maschera ed ho aggiunto delle timbrate con inchiostro Archival nero.
Ho fatto cadere delle goccie di inchiostro bianco, distressato i bordi del cartoncino con le forbici e poi ripassati con l'inseparabile Distress Ink Black Soot, poi l'ho incollato su cartoncino nero, ho aggiunto dello spago ed il sentiment, ricavato con la Dymo ed incollato su una striscia di cartone di recupero colorata con i Magical della Lindy's : Drop Dead Gorgeous Green e Tibetan Poppy Teal.

I have used Tim Holtz 'Umbrella Man' die (my preciousssss...ha ha ha...you have no idea for how long I have coveted this die...) to create a stencil, which I used with White Gesso to create a focal point image that could Resist to the colors I would have added later. After drying quite well I have built my background with Distress Oxides: Twisted Citron, Cracked Pistachio and Peacock Feathers, wiping away the colors from 'Resisting' image, then added D.O. Peacock Feathers with Tim Holtz Splash Stencil, dried and used the same stencil with a damp baby wipe to take off some background color. Spritzed and flicked some water, then used the die-cut Man as a mask and added few stamps here and there with Archival Black Ink. Flicked few drops of white ink, then distressed the borders with a scissor and with Distress Ink Black Soot. Glued to a piece of black cardstock, added some string and my sentiment, created with my Dymo and attached to a piece of recycled cardboard, previously painted with Lindy's Magicals Drop Dead Gorgeous Green and Tibetan Poppy Teal.


Presento questa card per le seguenti sfide.../ I submit this card to the following challenges:

- SIMON SAYS STAMP MONDAY CHALLENGE BLOG - RESIST IT

- SIMON SAYS STAMP WEDNESDAY CHALLENGE BLOG - ANYTHING GOES

- MIXED MEDIA PLACE BLOG - JANUARY CHALLENGE

E con questo vi ringrazio per essere passati di qua e vi saluto...alla prossima!

Thank you so much for stopping by, take care...see you next time!

Kisses&Hugs!
Simo.

mercoledì 10 gennaio 2018

My Winter Blues...


Ciao a tutti! Eccomi di nuovo qui alle prese con la nuova Sfida del Lunedì di SIMON SAYS STAMP - WINTER BLUES...

Hello everyone! Here I am, tackling the new Monday Challenge over at SIMON SAYS STAMP Blog - WINTER BLUES...

Per giocare con la sfida, ho aggiunto dei toni blu alla mia card, ma in realtà mi sono fatta ispirare dalla 'tristezza' invernale...in questi giorni, come per tutti, è arrivato il momento di disfare l'albero di Natale, spegnere le luminarie e le lucine...beh a me tutto questo mette una tristezza infinita...io mi terrei l'albero di natale addobbato tutto l'anno...lucine comprese! Allora ho pensato che avrei potuto creare una card un po' particolare...un po' di luce nei momenti di 'Blues'... 

To play along this Challenge I have added few touches of Blue, but for my inspiration I went for the nostalgic feeling of the end of the holidays...my Winter Blues...
In these days, like for everyone else, came that moment when you have to take off all your ornaments from the Christmas tree, turn off all the lights and such...well this always makes me really sad...I would have my decorated Christmas tree up all year round...lights included! So I thought I could create a special card...just a tiny light for these moments when I get the Blues...


Ho utilizzato le mie nuove thinlits 'Winter Wonderland'  per ritagliare il cerbiatto e creare lo sfondo 'bucherellato', ho ritagliato l'albero da un foglio della collezione 'Destinations' di Tim Holtz, usando la fustella Bigz 'Evergreen', ho infine tagliato varie volte la finestra con la fustella 'Window & Window Box' usando del cartoncino di recupero ed incollando le fustellate tra loro per creare profondità. Poi ho usato i Distress Inks per aggiungere del colore:
- Broken China - Stormy Sky per il cielo
- Peeled paint - Walnut Stain - Ground Espresso per l'albero
- Vintage Photo per il 'Bambi'
- Walnut Stain - Ground Espresso - Black Soot per la finestra
Ho assemblato tutto e ritagliato una striscia di carta dalla collezione 'St. Nicholas Collection' di Graphic 45 - la carta scelta si chiama 'Starry Night'...ovviamente!
Ho creato le pieghe poi ho aggiunto 2 pezzi di washi tape...quello 'brillantinoso' è della serie 'French' di Tim Holtz. Ho fustellato delle stelle e le ho incollate per creare il 'fermo' e tenere la card nella posizione voluta, poi ho aggiunto un paio di 'Clipping stickers'...ora basta aggiungere una Tea-light a batteria ed ecco la magia ha inizio...

 I have used my new 'Winter Wonderland' thinlits dies  to die cut the fawn and to create the 'pierced' background, die-cut the tree with the 'Evergreen' Bigz die, from a piece of paper of Tim Holtz 'Destinations paper stash', last die cut few times some  recycled cardboard with the  'Window & Window Box' Bigz die, and glued the windows together to create some depth.
Used Distress Inks to add colour:
- Broken China -  Stormy Sky for the sky
- Peeled paint - Walnut Stain - Ground Espresso for the tree
- Vintage Photo for  'Bambi'
- Walnut Stain - Ground Espresso - Black Soot for the window
Glued everything together, then cut a strip from Graphic 45 'St. Nicholas Collection' paper pad...the paper used is called 'Starry Night'...of course!
I created the folds for the card, added 2 strips of washi tape...the 'glittered' one is from Tim Holtz 'Frech' bundle. Die cut few stars and glued them together to help the front of the card to stay in place, then added a couple of 'Clipplings stickers'...now it's time to switch a battery Tea Light on and the magic begins...


Presento questa card per le seguenti sfide/I submit this card to the following Challenges:

- SIMON SAYS STAMP MONDAY CHALLENGE BLOG - WINTER BLUES

- HAPPY LITTLE STAMPERS JANUARY ANYTHING GOES WITH DIES CHALLENGE 


Con questo è tutto...grazie per essere passati di qua! Spero che questo progetto vi sia piaciuto...ci vediamo alla prossima!

That's all for now...thank you for popping by! I do hope you enjoyed this project...see you next time!

Kisses&Hugs!
Simo.

lunedì 14 agosto 2017

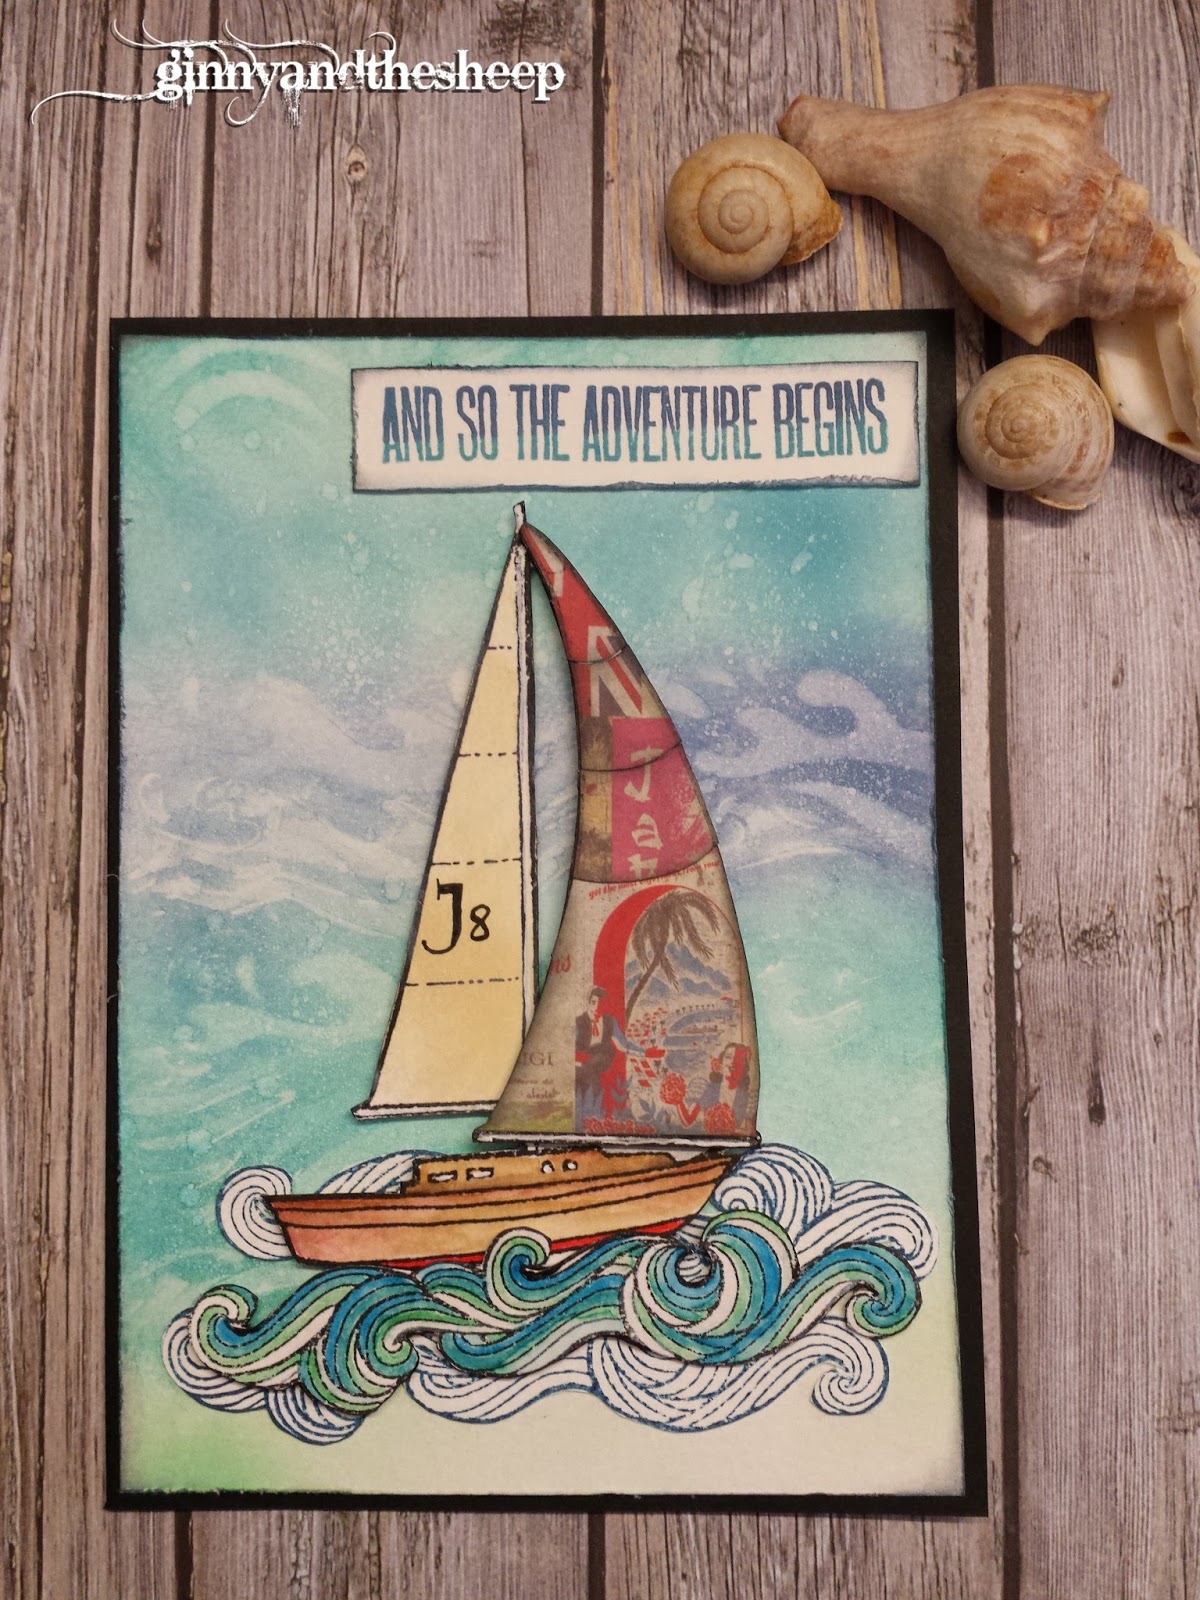
LET'S SET SAIL!


Hello everyone and welcome back! This is my 2nd week as Guest Designer at SIMON SAYS STAMP MONDAY CHALLENGE BLOG...and I'm having a blast...This week's theme is NAUTICAL so...Let's set sail!

Ciao a tutti e bentornati! Questa è la mia seconda settimana come Guest Designer per SIMON SAYS STAMP MONDAY CHALLENGE BLOG...e mi sto divertendo da matti...Il tema di questa settimana è NAUTICAL, quindi...si salpa!


Today is a very special day as it's my beautiful Nephew's 8th Birthday...oh my...already...I can't believe how fast time flies! It seems like yesterday, when  I saw this perfect bundle of joy for the very first time, with those rosy, chubby cheeks...Yes, I am a very proud Auntie!!!
So, to celebrate the date I made this Birthday card...you will find the list of the materials used and available at Simon Says Stamp Store  at the end of the post...let's start!

Oggi è un giorno molto speciale, infatti il mio bellissimo nipotino compie 8 anni!...Oh mamma...come vola il tempo! Sembra solo ieri quando ho visto per la prima volta questo fagottino dalle guance paffute e rosa...Si, sono una zia molto orgogliosa!!!
Quindi, per celebrare questa data ho preparato una classica 'Birthday card'...trovate l'elenco dei prodotti usati e disponibili presso il Simon Says Stamp Store, in fondo a questo post...Iniziamo!


Cut a piece of heavy weight watercolor paper at 5x7 inches, then take the stencil that comes with the Stamp Set 'Cling Sailboats' by Stampendous, and position it at about three quarter of the paper, then smear here and there Distress Micro Glaze, to make a sort of resist...do not use too much product, just lightly tap your finger on the Glaze and rub it through the stencil...Clean it afterwards.

Partite da un pezzo di carta per acquerello delle dimensioni di 5x7 inches (12,7x17,8 cm circa),
posizionate lo stencil che si trova nel set di timbri 'Cling Sailboats' di Stampendous, a circa 3 / 4 della card ed usate la Distress Micro Glaze per creare una sorta di effetto 'resist'...non usatene troppo, picchiettate leggermente il dito sulla 'pasta' e poi strofinatelo attraverso lo stencil...Pulitelo subito dopo.


Now,  starting from the bottom blend with a Mini Blending Tool the following Distress Oxides: Cracked Pistachio, Peacock Feathers, Broken China and Faded Jeans, then start again with Peacock Feathers to finish with Broken China at the very top.
Dry with a heat tool, then place the stencil again, and rub off some color using an almost dry baby wipe. Spritz with water, dry for a moment then lift the water in excess just lightly tapping with a paper towel. Splatter with very thinned white acrylic paint, then distress the edges of our card using a distress tool or a pair of scissors and darken all around first with Distress Ink Stormy Sky, then Distress Ink Hickory Smoke.

Ora, iniziando dal fondo, con l'aiuto del Mini Blending Tool, colorate con i seguenti Distress Oxides: Cracked Pistachio, Peacock Feathers, Broken China e Faded Jeans, poi ricominciate con Peacock Feathers e finite con Broken China .
Asciugate, riposizionate lo stencil e togliete un po' del colore del fondo utilizzando una salviettina quasi asciutta. Spruzzate con acqua, asciugate per un momento poi tamponate leggermente con un pezzo di carta per togliere l'acqua in eccesso. Diluite dell'acrilico bianco e fatelo cadere sullo sfondo, poi 'rovinate' i bordi della card con un distress tool o con le forbici e scurite i bordi usando i Distress Inks Stormy Sky e Hickory Smoke.


Now let's prepare our focal point...On watercolor paper stamp two times the 'waves' of the 'Sailboats' set using Distress Oxide Faded Jeans, and heat set. Then stamp it a third time using StazOn Jet Black Ink, use it also to  stamp the bigger Sailboat, then ink only the 'main' sail and stamp it once on watercolor paper and then on patterned paper...I have used a piece from Tim Holtz 12x12 Destinations Paper Stash . TIP: you could stamp it several times on different patterned papers, so once cut all the pieces and assembled on the base, you will have a multi-colored sail!
Fussy cut the waves, the Boat and the Sails... Just a reminder...there is also a set of matching dies which coordinates with these stamps...easy peasy!

Adesso è il momento di preparare il nostro 'focal point'...Timbrate 2 volte su carta per acquerello le 'onde' del set, usando il Distress Oxide Faded Jeans ed asciugate con un heat tool.
Poi timbratele una terza volta usando lo StazOn Jet Black. Con lo stesso inchiostro timbrate la barca più grossa .Poi inchiostrate solo la vela più grossa e timbratela una volta su cartoncino pesante e poi su carta patterned...io ho usato un foglio della collezione 12x12 'Destinations' di Tim Holtz. TIP: se timbrate varie volte la vela su diverse carte patterned, una volta ritagliati i vari pezzi ed assemblati, avrete una Vela super-colorata!
Ritagliate le onde, la Barca e le 2 vele... Un piccolo appunto...c'e un set di fustelle coordinate con questi timbri...giusto per rendere il tutto più facile!


From the Sail stamped on the patterned paper, cut 4 main pieces, following the dotted lines of the stamped image and distress the edges of these pieces with Distress Ink Black Soot. Assemble the 'designer' sail gluing all the pieces to the spare sail. Set aside to dry well. Meanwhile let's paint the rest...for the sail on the left use first Distress Ink Antique Linen, then blend in with Distress Oxide Antique Linen. I added 'J8' (the initial letter of my Nephew's name and his age) with a black marker. For the sail that will be covered add few touches of Distress ink Hickory Smoke, then Black Soot.
Let's paint the boat: leave the bottom white and paint the line just above with Candied Apple Distress Marker , paint the rest with Distress Crayons (See photo for reference): put a tiny bit of color on an acrylic block, then pick up the paint with a Water-Brush...Mix Rusty Hinge and Vintage Photo and color the boat, then go back only with Vintage Photo. Add few touches of Walnut Stain to enhance the shadows and a bit of Festive Berries here and there.

Dalla Vela timbrata su patterned paper ritagliate 4 pezzi principali, seguendo le linee che si trovano sull'immagine timbrata e scurite i bordi di questi pezzi con il Distress Ink Black Soot. Assemblate la vela 'di design', incollando i vari pezzi sulla vela precedentemente ritagliata. Mettete da parte e, nel frattempo dipingete il resto...per la vela a sinistra usate Distress Ink Antique Linen, poi aggiungete il Distress Oxide Antique Linen. Io ho aggiunto 'J8' (dove la J è l'iniziale del nome di mio nipote e 8 è la sua ètà) con un marker nero. Per la vela che verrà coperta da quella decorata, colorate con qualche tocco di Distress Ink Hickory Smoke e poi Black Soot.
Ed ora dipingete la Barca: lasciate il fondo bianco e colorate la linea appena sopra con il Distress Marker Candied Apple , colorate il resto usando i Distress Crayons (guardate la foto come riferimento): mettete poco colore su un blocchetto acrilico e prelevatelo con un Pennello a Serbatoio...Mescolate Rusty Hinge con Vintage Photo e colorate la barca, poi ripetete solo con Vintage Photo. Aggiungete qualche tocco di Walnut Stain per scurire le ombre, e un po' di Festive Berries qua e là.


Add a piece of recycled cardboard on the back of the Sail, to add dimension and glue it to the main body, then glue a piece of cardboard on the back of the boat as well, and set aside.
Position the first 'blue wave' on the background and glue in place, then add the boat and the second blue wave (see pic as reference)....now paint the black one with the following Distress Markers: Picket Fence, Cracked Pistachio, Peacock Feathers and Mermaid Lagoon. Then go back with a water-brush to soften the lines.
Add some cardboard on the back of the wave too, and glue it under the boat...I love the overall 3D effect with all the dimensional pieces!
Now it's time to add a sentiment...I have used a Tim Holtz stamp found in the Ranger Distress Watercolor Kit, which contains also the Distress Crayons set n.2 used in this project...stamp first with Distress Oxide Broken China, dry and then add Distress Oxide Faded Jeans only at the top of the stamp, to create an 'ombre' effect. Cut out, distress the edges and darken with Distress Ink Stormy Sky and Hickory Smoke. Glue in place. Simply mount the card on black cardstock.

Incollate un pezzo di cartone riciclato sul retro della Vela, per aggiungere spessore ed attaccatela alla Barca...aggiungete dei pezzi di cartone anche dietro a questa e mettete da parte.
Posizionate la prima 'onda blu' sullo sfondo, e quando soddisfatti incollate, aggiungete la Barca e la seconda onda. Adesso dipingete l'onda timbrata in nero, utilizzando i seguenti Distress Markers: Picket Fence, Cracked Pistachio, Peacock Feathers e Mermaid Lagoon. Poi ripassate i colori con un Pennello a serbatoio, per addolcire e togliere eventuali linee troppo marcate.
Incollate dello spessore anche all'onda ed attaccatela sotto alla barca...Mi piace molto l'effetto 3D ottenuto con i vari spessori!
E' arrivato il momento di aggiungere una frase alla nostra card...Io ho usato un timbro di Tim Holtz trovato nel Distress Watercolor Kit della Ranger, che contiene anche il Set n.2 dei Distress Crayons usato in questo progetto... stampate prima usando il Distress Oxide Broken China, asciugate e poi inchiostrate il timbro solo sulla parte superiore con Distress Oxide Faded Jeans, e timbrate ancora, per creare una sorta di effetto 'ombre'
Ritagliate, rovinate i bordi e colorateli con Distress Ink Stormy Sky e poi con Hickory Smoke. Incollate la scritta e 'mattate' la card su cartoncino nero.


Here's a peek at the inside of the card...I kept it very simple...
Qui potete dare un'occhiata all'interno della card...sono rimasta sul semplice...


Hope you enjoyed this week's project, please do check this Amazing Design Team for awesome inspirations! We look forward to see what you'll create, remember that you could win a $50 voucher for your shopping at Simon Says Stamp Store, so..now it's up to you! You have until Monday 8:00 am Ohio time, 1:00 pm UK time, 2:00 pm CET to join the fun!


Spero che il progetto di questa settimana vi sia piaciuto...Prendete spunto ed ispirazione da questo Incredibile Design Team ed i loro fantastici progetti! Non vediamo l'ora di vedere le vostre creazioni e ricordate che potreste vincere un voucher di $50 per i vostri acquisti da Simon Says Stamp, quindi...adesso tocca a voi!
Avete tempo fino a Lunedì alle 8:00 am Ohio, 13:00 UK, 14:00 CET per postare i vostri lavori!


What you'll need/Materiale utilizzato:


Thank you for spending some time with me...See you next time...

Vi ringrazio per aver passato un po' di tempo in mia compagnia...Ci vediamo alla prossima...

Kisses&Hugs!

Simo.