Visualizzazione post con etichetta July. Mostra tutti i post

mercoledì 25 luglio 2018

Simon Says...Christmas in July!


Ciao a tutti! Buon Nataleeee! He he he.. no...non sono impazzita...è il nuovo tema della Sfida del Lunedì di SIMON SAYS STAMP...Christmas in July!
Per aggiungere incanto a delizia i prodotti nello 'Spotlight' sono del nostro adorato TIM HOLTZ...cosa c'è di meglio? E qui nasce il problema...cosa usare? Tra le fustelle, i timbri, gli stencils, i colori, gli abbellimenti (che sono sempre troppo pochi)... non ridete...il problema è serio! Lol...no beh...non così serio dai...Dopo aver tirato fuori l'inverosimile ho optato per un abbellimento per l'albero di Natale, perchè sarete d'accordo con me...gli addobbi per l'albero non sono mai troppi!
Trovate la lista dei materiali usati in fondo al post.
Per questa sfida il team di Simon ha organizzato un bellissimo BLOG HOP...4 fortunati riceverano un pacco regalo...andate a dare un'occhiata...

Hello everyone! Merry Christmas!!!! He he he....no...I'm not completely mad...it's the new theme for the SIMON SAYS STAMP MONDAY CHALLENGE...Christmas in July!
To add even more delight to this, they are showcasing TIM HOLTZ products...now...is there anything better? And there's the dilemma...what to use? What to choose among dies, stamps, stencils, inks, embellishments (not nearly enough of them actually)...c'mon don't laugh...the struggle is real! Lol..well ok..maybe not struggling...After I submerged my craft table with A LOT of goodies I decided to create an ornament for my Christmas Tree...because you will all agree with me...ornies are  never enough!
You will find the list of the supplies used at the end of this post.
For this challenge Simon team has come up with a BLOG HOP...4 lucky winners will get a box full of goodie...check that out!


Ho deciso di ricavare una cornice con le fustelle Movers & Shapers 'Vintage Cabinet Card' e 'Mini Cabinet Card', ritagliando varie volte del cartone di recupero ed incollando i vari strati tra loro.
Ho embossato la cornice con la polvere clear e lo stencil  Woodgrain e poi ho usato Distress Stains, Distress Mini inks e Picket Fence Crayon per aggiungere colore.

I decided to die cut a frame using Movers & Shapers dies 'Vintage Cabinet Card' and 'Mini Cabinet Card', cutting from recycled cardboard and glueing together all the layers. Embossed the frame with Clear embossing powder and Woodgrain stencil, then used Distress Stains, Distress Mini inks and Picket Fence Crayon to add colour.


Ho ritagliato l'albero usando un foglio dal set 'Destinations' di Tim Holtz e la fustella 'Evergreen', su cui ho aggiunto dei dettagli con lo stencil Stiched e la pasta Crackle, scurito i bordi con i Distress inks ed incollato le fustellate di cervo e cerbiatto dal set Winter Wonderland.

Die cut the tree using 'Evergreen' die and a piece of paper from Tim's 'Destinations' set, added Crackle paste with the 'Stiched' stencil, then darkened the edges with Distress inks. 
Die cut the deer and the fawn using  Winter Wonderland dies set and glued everything in place.


Per l'interno ho usato un pezzo di carta del set 'French Industrial', aggiunto la pasta Crackle con lo stencil Holiday Script, e una volta asciutto ho aggiunto colore con Distress Stains e inks, ed aggiunto sul numero dei tocchi con i Distress Crayon metallici.
Ho fustellato del fogliame con il set 'Mini Holiday Greens', e li ho colorati alcuni con Distress Stains ed altri embossati con la polvere 'Vintage Photo'.

For the inside of the frame I have used 'French Industrial' paper set, added Crackle paste with Holiday Script stencil, once dry added colour with Distress Stains and inks, then added few touches on the number with Distress Crayons Metallics .
Die cut some greenery with 'Mini Holiday Greens' set and used Distress Stains and embossing powder 'Vintage Photo'-


Ho ritagliato la scritta 'Noel' con le fustelle 'Vintage Tidings' ed embossata con polvere 'Liquid Platinum', il fiocco di neve sempre con la carta 'Destinations'  è ricavato con la Decorative Strip 'Mini Snowflake rosette', ed incollato infine 2 brads in metallo.

Die cut 'Noel' word using 'Vintage Tidings' set and embossed with 'Liquid Platinum' embossing powder, the snowflake is die cut with Decorative Strip 'Mini Snowflake Rosette' using 'Destinations' paper.  As a final touch I added 2 metallic brads.


Materiale usato...../Supplies used.....

Sizzix/Tim Holtz Alterations Movers&Shapers 'VINTAGE CABINET CARD' Die
Sizzix/Tim Holtz Alterations Movers&Shapers 'MINI CABINET CARD' Die
Sizzix/Tim Holtz Alterations BIGZ 'EVERGREEN' Die
Sizzix/Tim Holtz Alterations Sizzlits/Decorative Strip 'MINI SNOWFLAKE ROSETTE'
Sizzix/Tim Holtz Alterations Thinlits 'WINTER WONDERLAND'
Sizzix/Tim Holtz Alterations Thinlits 'MINI HOLIDAY GREENS'
Sizzix/Tim Holtz Alterations Thinlits 'HOLIDAY TIDINGS'
Stampers Anonymous/Tim Holtz Collection Layering Stencil 'WOODGRAIN'
Stampers Anonymous/Tim Holtz Collection Layering Stencil 'STICHED'
Stampers Anonymous/Tim Holtz Collection Layering Stencil 'HOLIDAY SCRIPT'
Ranger Embossing Powder CLEAR
Ranger Embossing Powder LIQUID PLATINUM
Ranger/Tim Holtz Distress Embossing Powder VINTAGE PHOTO
Ranger/Tim Holtz Distress STAIN PICKET FENCE
Ranger/Tim Holtz Distress STAIN FRAYED BURLAP
Ranger/Tim Holtz Distress STAIN BRUSHED PEWTER
Ranger/Tim Holtz Distress STAIN TARNISHED BRASS
Ranger/Tim Holtz Distress CRAYON PICKET FENCE
Ranger/Tim Holtz Distress CRAYON BRUSHED PEWTER
Ranger/Tim Holtz Distress CRAYON TARNISHED BRASS
Ranger/Tim Holtz Distress INK Mini GROUND ESPRESSO
Ranger/Tim Holtz Distress INK Mini BLACK SOOT
Ranger Mini Ink Blending Tool
Ranger Glossy Accents
Tim Holtz Idea-ology 'DESTINATIONS' 12x12 Paper Stash
Tim Holtz Idea-ology 'FRENCH INDUSTRIAL' 12x12 Paper Stash
Embossing Pad
Metallic brads
Cartone di recupero/ Recycled Cardboard
Colla/ Glue

Questo è tutto...grazie per essere passati...ci vediamo alla prossima!

That's it...Thanks for stopping by...see you next time!

Kisses&Hugs!
Simo.

EDIT:
Non riesco ancora a crederci...ma sono una delle vincitrici del Christmas Blog Hop...non potrei essere più felice! Grazie!

Still can't believe it...but I am one of the 4 winners of the Christmas Blog Hop...couldn't be happier! Thank you so much!

venerdì 20 luglio 2018

Leave a little SPARKLE...


Ciao a tutti e bentornati! Oggi sono particolarmente contenta..finalmente mi sono dedicata ad un progetto Steampunk...ho usato un sacco di Gesso nero (che mi rende sempre felice) ed ho fatto un nuovo video!

Hello everyone and welcome back! Today I am particularly happy...finally I have made a Steampunk project...I have used a lot of Black Gesso (which always makes me so happy) and I have made a new video!

Quindi...niente tutorial, solo foto dei particolari...godetevi il video in italiano (in fondo alla pagina)...trovate la lista dei materiali usati nel box Descrizione. Buon divertimento!

Hence...no tutorial, only photos of the details...enjoy the video (at the end of the post...it's in Italian, but with English captions) You will find the full list of supplies in the Description box...Enjoy!


Buona visione....Enjoy...


Spero vi sia piaciuto e che vi abbia dato un po' di ispirazione...

Hope you liked it and got inspired...

Presento questo progetto per le seguenti sfide:
I submit this project to the following Challenges:

- SIMON SAYS STAMP MONDAY CHALLENGE BLOG: ADD A LITTLE SPARKLE

- SANDEE&AMELIE'S STEAMPUNK SUMMER SPECIAL 2018 CHALLENGE : 
  ANYTHING GOES: STEAMPUNK/INDUSTRIAL

Grazie per essere passati di qua...ci vediamo alla prossima!

Thank you for stopping by...see you next time!

Kisses&Hugs!
Simo.

EDIT:
Sono felicissima di essere stata scelta per lo SPOTLIGHT di SIMON SAYS STAMP per questo progetto! Grazie di cuore!

I am so so happy to have been featured in the DESIGNER SPOTLIGHT at SIMON SAYS STAMP for this project! Thank you very much!

domenica 15 luglio 2018

SUMMER DREAM...


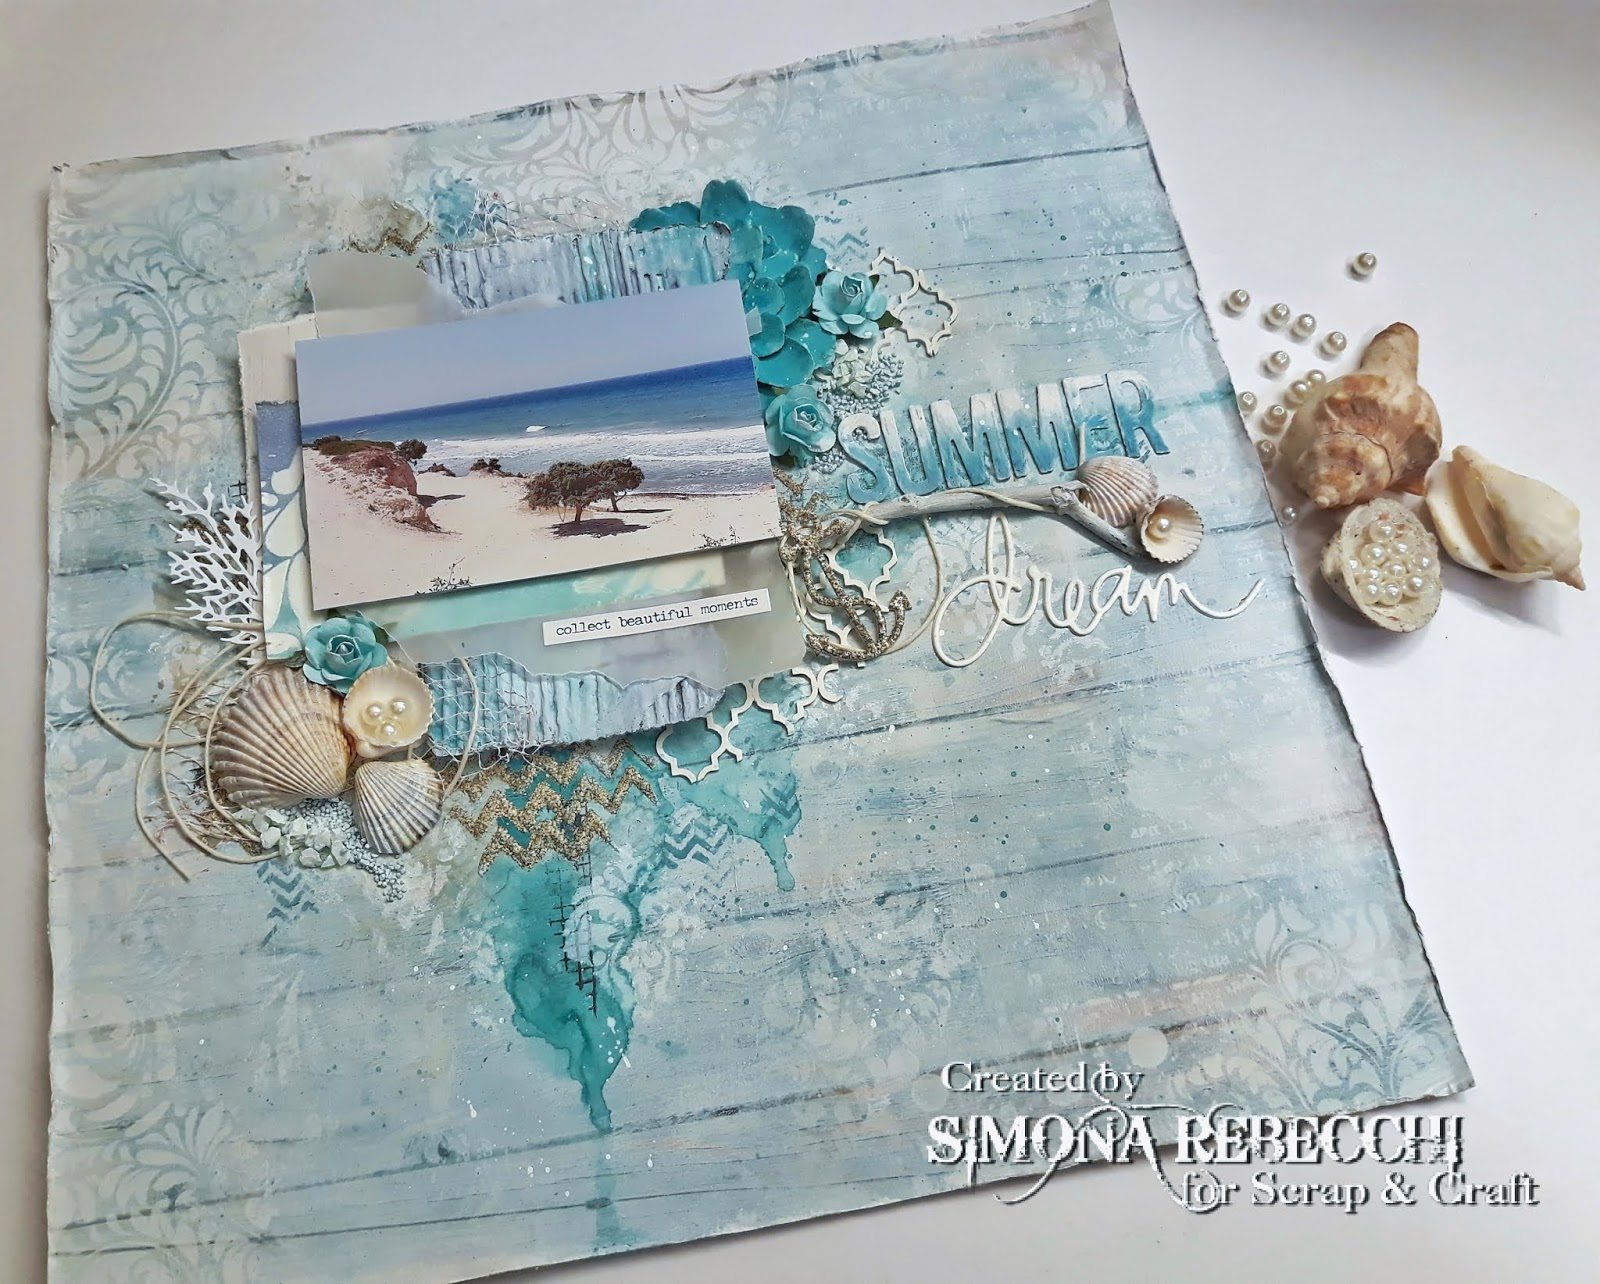
Ciao a tutti e bentornati! Oggi vi presento il mio nuovo progetto per Scrap&Craft...un layout estivo...
Potete trovare il post originale sul Blog di Scrap & Craft QUI

Hello everyone! Today I want to show you my brand new project for Scrap&Craft...a breezy, summery LayOut...
You can find the original post on Scrap & Craft Inspiration Blog  HERE

Iniziamo...
Ho coperto la pagina con Gesso Clear, poi ho steso del gesso bianco diluito con un rullo ed asciugato. Ho cercato la posizione giusta per la composizione e quando l'ho trovata ho aggiunto colore e texture...

Let's start...
I have covered the paper with Clear Gesso, then with a wash of white gesso added with a brayer.
Once I have found the perfect placement for my composition  I added colour and texture...


Ho usato i Distress Oxides Ice Spruce, Broken China e Frayed Burlap, poi ho aggiunto della modeling paste e mentre era ancora umida ho coperto con Dirty Sand Baked Texture ed embossato, aggiunto timbrate con Archival ink nero e con l'Oxide Broken China, poi ho usato lo stencil Gothic di Tim Holtz ed il colore acrilico Dylusions White Linen....

Have used Distress Oxides Ice Spruce, Broken China and Frayed Burlap, then added modeling paste and while it was wet I covered with Dirty Sand Baked Texture and heat set, added stamping using both black Archival ink and Broken China Oxide then used Tim Holtz Gothic Layering stencil with Dylusions White Linen paint...


Ho incollato i vari strati sotto la foto, usando cartone, cartoncini di recupero e del vellum e quando tutto era al suo posto ho aggiunto altro colore con InkExtreme Smeraldo di TommyArt...asciugato bene ed aggiunto gli elementi 3D...conchiglie, perle, fiori, un pezzetto di legno, delle chipboard e delle fustellate. Per finire ho fatto cadere gocce di Smeralso molto diluito ed inchiostro bianco.

Glued all the layers under the photo ...I have used a lot of scrap papers, cardboard and pieces of vellum, when everything was in its place I added more colour with Emerald InkExtreme by TommyArt...dried very well then added 3D elements...seashells, pearls, flowers, a piece of wood, chipboards and die cuts. To finish it off spattered with very diluted Emerald and white ink.

Ecco i dettagli...
Here's more details...


Ho usato il seguente materiale di /Used the following supplies from  SCRAP & CRAFT STORE:


Presento questo progetto per le seguenti Sfide:
I submit this project to the following Challenges:

- SIMON SAYS STAMP MONDAY CHALLENGE BLOG : SUMMER FUN


- MORE THAN WORDS JULY 2018 MAIN CHALLENGE: BEACH & SEASHELLS

For this month's challenge I took inspiration from the picture that I have used on the Layout...
I am very fond of this photo, taken last year on the beautiful and 'wild' Ag. Theologos beach in Kos...the mesmerizing sound of the waves and the amazing shades of the sea are still so vivid in my memories...I collected the seashells used, during my holidays in different Greek Islands, through the years...I'm not much of a 'Sun tan at all costs' person...fair skin and hair really do not help, lol! But I love strolling on the beach, looking for 'treasures' to be added to my stash of  'Holiday keepsakes'!

E con questo è tutto...spero vi sia piaciuto! Buona Domenica e...ci vediamo alla prossima!

That's it...hope you enjoyed this project...Have a great Sunday and....see you next time!

Kisses&Hugs!

Simo


EDIT:
Sono felicissima di essere stata inserita nello SPOTLIGHT di More Than Words con questo Layout!
Grazie!

I am so happy and proud to have been featured in the SPOTLIGHT at More Than Words with this LO! Thank you so much!

E di essere stata inserita nell'elenco delle HONOURABLE MENTIONS per la sfida di Luglio!

And to be featured into the HONOURABLE MENTIONS for the July Challenge!

domenica 1 luglio 2018

Scrap&Craft DT: Curiosity...a Mini Inspirational Journal


Ciao a tutti e bentornati! Siamo già a Luglio...non riesco a crederci...vi state già godendo le meritate vacanze? Per me il mare...cioè la Grecia, lol...è ancora distante, quindi mi distraggo con questo Mini Inspirational Journal...chissà...magari leggendo frasi ispirate e motivazionali sento meno il bisogno di scappare su una spiaggia greca...he he he...
Come sempre potete trovare il post originale su  SCRAP & CRAFT Blog .

Hello everyone and welcome! And July is here.. hard to believe it...are you already enjoying your well deserved summer holidays? Mine are still quite far ahead, so I try not to think about them too much, with the help of this Mini Inspirational Journal...who knows...maybe reading inspirational and motivational quotes will ease my need to run away on a pristine greek beach...he he he...
As always you can find  the original post on the SCRAP & CRAFT Blog .

Ho deciso di creare questo mini Art Journal per raccogliere i vari cartoncini e fogli utilizzati per fare pratica con varie tecniche o per testare materiali nuovi. Il fatto di aggiungere su ogni pagina una frase ispirata (dagli Small Talk di Tim Holtz) mi ha fatto venire l'idea di trasformarlo in un vero e proprio Journal motivazionale!

I have decided to create this little Art Journal in order to store in one place those pieces of cardstock that I use to practice new techniques or test new products...Then the idea to add a lovely quote to each page (using Tim Holtz Small Talk stickers) turned this 'practice journal' into an Inspirational Art Journal !

La struttura del mini è davvero basica...ho usato del cartoncino nero pesante come supporto per ogni pagina, poi con lo stesso cartoncino ho creato una 'cerniera' che mi permette di collegare tra loro le varie pagine, lunga quanto il journal e larga 1 pollice, poi piegata a metà. Ogni volta che ho una pagina nuova la incollo semplicemente con del nastro biadesivo ed aggiungo una nuova 'cerniera'. Facilissimo!

The structure itself is really basic...used black thick cardstock as a base for each page, then cut a 1" wide piece of cardstock and scored in half to create an hinge...everytime I have a new page I simply stick it to the black cardstock with double sided tape, and add a new hinge. Easy peasy!

Qui potete vedere la copertina e la prima pagina...in QUESTO POST parlo della nascita di questo journal...

Here you can see the cover and the first page....THIS POST is how this journal came to be...


Ecco qualche dettaglio...  Here's few details...


Per creare questo spread un po' grunge ed un po' romantico ho aggiunto interesse e texture con timbrate, modeling paste e washi tape. Ho usato i Distress inks e crayons Walnut Stain e Black Soot per aggiungere colore e profondità, poi dei tocchi di inchiostro bianco per dare un po' di luce.
Per l'immagine centrale ho usato un timbro che adoro di Stamperia, ho aggiunto ombre e colore con dei Markers e poi la cornice chipboard embossata con la Baked Texture 'Patina Oxide' di Seth Apter...adoro questo effetto!

To create this grungy and yet romantic little spread I added texture and interest with stamping, stenciling and washi tape...used Walnut Stain and Black Soot Distress inks and crayons to add depth, then splashes of white to highlight. 
Used a stamp from Stamperia for the focal image, adding shadows and colour with Markers, and then  a beautiful chipboard frame that I have embossed with Seth Apter's Baked Texture 'Patina Oxide'...love this effect!


Questo è il materiale usato dallo Store di SCRAP & CRAFT:
These are the supplies used from SCRAP & CRAFT STORE:


E questo è tutto...spero vi sia piaciuto questo progetto...buona Domenica e...ci si vede alla prossima!
That's it...hope you enjoyed this project...have a great Sunday! See you next time!

Kisses&Hugs!
Simo.

giovedì 27 luglio 2017

STEAMPUNK EDGES...


Ciao e bentornati su queste pagine! Oggi vi propongo questa mini tela...prima una 'confessione'...avevo iniziato un progetto su questa canvas MA, come a volte succede,  il risultato non mi piaceva per niente, quindi...pronta per il riciclo!

Hello and welcome back! Today I'm gonna talk about this mini canvas...but first I have a 'confession' to make...I used this canvas before for another project BUT, as sometimes happens, I really disliked the result, so I decided to recycle it and give it a  new look!

Prima di tutto ho incollato dei pezzi di pagine di libro usando il Soft gel medium, poi ho incollato i negativi di varie fustellate...si...tengo anche i negativi..lo ammetto...sono una hoarder!!!Lol! Però in questo caso ho fatto bene, visto che sono tornati utili? Scherzi a parte, i ritagli, i negativi, oltre che ovviamente le fustellate vere e proprie sono perfetti per creare struttura e texture nello sfondo!
Ho usato molti ingranaggi tagliati con la BIGZ 'Industrial' di Tim Holtz e con 'Gadget Gears #2', ho usato anche la fustella 'Weathered Clock' sempre di Tim Holtz, poi ho coperto tutto con il Gesso bianco. Quando asciutto ho usato il 3D Gel Medium per attaccare delle perline. Ho asciugato e passato una nuova mano di gesso bianco.

First of all I have covered the canvas with pieces of book pages, using Soft gel medium, then I started attaching also left-overs from die-cuts, as the negatives...yes, I know...I'm a hoarder!!!Lol! But for this piece they are perfect to create texture! I have also used gears and cogs die-cuts using Tim Holtz 'Industrial' and 'Gadget Gears #2' dies, used Tim Holtz 'Weathered Clock' die too.  Then I covered everything with white gesso...when dry I attached some beads using 3D Gel Medium, dried and covered once again with white gesso.

Ed ora...LINDY'S!!! Questi in ordine sono gli spray che ho utilizzato:
And now...LINDY'S!!!! These are the sprays used:

C'est la vie Cerise - Flat Fabio
Time Travel Teal - Starburst
Tibetan Poppy Teal - Magical
Hydrangea Blue - Starburst
Buccaneer Bay Blue - Moon Shadow Mist
Screamin' Banshee Black - Starburst

I colori più chiari li ho spruzzati, aggiungendo acqua con uno spruzzino, prima in alto, facendo correre il colore e poi da sinistra verso destra. I colori più scuri li ho spruzzati solo a sinistra.

Started with the lighter shades first on top, then from left to right, always spritzing with water to make the colour run. The darker shades are used only on the left part.


Ho aggiunto un po' di effetto 'rusty' qua e là e poi ho deciso di utilizzare un paio di chipboards di Boozybear...Prima li ho tamponati con il Distress Stain Antique Bronze, poi li ho embossati usando la polvere per embossing Distress Vintage Photo...la texture è perfetta!
Ho aggiunto dei 'Clippings Stickers' di Tim Holtz Idea-ology, mattati su cartoncino nero...e la mia mini tela Steampunk è pronta!

Added a little bit of 'Rust' here and there, then used a couple of chippies by Boozybear...first I have coloured them with Antique Bronze Distress Stain, then embossed using Distress Embossing Powder - Vintage Photo...perfect texture!
As final touch I chose these little Idea-ology 'Clipping Stickers'...my Steampunk mini canvas is ready!


Presento questo progetto per le seguenti sfide/ I submit this project to the following challenges:

- SIMON SAYS STAMP MONDAY CHALLENGE: YOU'VE GOT THE EDGE

- SANDEE & AMELIE'S 2017 SUMMER SPECIAL STEAMPUNK CHALLENGE - 
  "ANYTHING GOES - STEAMPUNK/INDUSTRIAL"


Grazie per essere passati di qua...alla prossima!

Thank you for popping by...see you next time!

Kisses&Hugs!
Simo.

martedì 18 luglio 2017

How to SHAPE the perfect SMILE...


Ciao a tutti! Finalmente eccomi di nuovo su queste pagine, dopo una breve vacanza nella splendida KOS...prossimamente posterò qualche foto delle meravigliose spiagge visitate...Ma ora concentriamoci sulle sfide di questa settimana!
Ho infatti deciso di unire la nuova sfida settimanale del Lunedì di SIMON SAYS STAMP 'GET IN SHAPE' e quella mensile di SANDEE & AMELIE'S STEAMPUNK CHALLENGE 'ANYTHING GOES - STEAMPUNK/INDUSTRIAL' ...il risultato è questa macchina fotografica in 3D dal sapore Vintage e decisamente STEAMPUNK!

Hello everyone! I'm finally back on these pages, after a very short holiday in the beautiful KOS Island...soon will post few pictures of the amazingly beautiful beaches we have seen...But now let's focus on this week's challenges!
I have decided to 'merge' the new Monday Challenge over at SIMON SAYS STAMP 'GET IN SHAPE', with the monthly challenge at SANDEE & AMELIE'S STEAMPUNK CHALLENGE 'ANYTHING GOES - STEAMPUNK/INDUSTRIAL'...the result is this Vintage but mostly STEAMPUNK 3D Camera!


Mi sono divertita un mondo a creare questo 'contenitore' utilizzando la fustella 'Vintage Camera' e gli ingranaggi ritagliati con 'Gadget Gears #2', entrambe di Tim Holtz, ho aggiunto anche degli ingranaggi chipboard di Boozybear, dal bellissimo set vinto in una sfida di SanDee&Amelie ed infine qualche rondellina di metallo. Effetto ruggine come se non ci fosse un domani e loro...due adorabili Paper Dolls di Tim Holtz...ma non sono meravigliose?

I had so much fun creating this 3D shape using 'Vintage Camera'  Bigz die, and of course 'Gadget Gears #2', both by Tim Holtz...I also added few chippies by Boozybear, from the awesome sets I won in a challenge at Sandee&Amelie's, and a few metal ones. Faux Rust effect all over the place and them..2 adorable Paper Dolls by Tim Holtz...aren't they wonderful?


Quindi presento questo progetto per le seguenti sfide/So I submit this project to the following challenges...

- SIMON SAYS STAMP MONDAY CHALLENGE: GET IN SHAPE

- SANDEE&AMELIE'S 2017 SUMMER SPECIAL STEAMPUNK CHALLENGE! - 
 ANYTHING  GOES - STEAMPUNK/INDUSTRIAL


Ci vediamo alla prossima...Fino ad allora...

See you next time...Until then...

Kisses&Hugs!
Simo.

EDIT:


lunedì 3 luglio 2017

Be Brave...Be Free...


Ciao a tutti! Siamo già in Luglio...qui il tempo vola! Domani è il 4 Luglio e per i nostri amici americani sarà una giornata di festa, quindi sia per augurare loro una buona festa dell'Indipendenza, sia per partecipare alla nuova SFIDA del LUNEDI di SIMON SAYS STAMP, (Red White and/or Blue) ho preparato questa Tag a 'Stelle&Strisce'...

Hello everyone! We are already in July..time flies for sure! Tomorrow is the 4th of July and for our american friends will be a day to celebrate, so, both to wish them a great Indipendence Day and to take part to the new MONDAY CHALLENGE over at SIMON SAYS STAMP, (Red White and/or Blue) I made this 'Stars&Stripes' Tag...

Finalmente ho usato una Paper Doll di Tim Holtz...quando ho aperto il pacchetto ed ho visto questa 'bimba' con la bandiera ho pensato subito che sarebbe stata perfetta per un progetto come questo!
Da parte ho sempre qualche Tag, ritagliate utilizzando il set 'Tag Collection' di Sizzix/Tim Holtz Alterations: per il background ho semplicemente steso il Distress Ink Mustard Seed ed usato il Distress ink Black Soot con lo stencil  Typo, sempre di Tim.
Ho steso della Modeling Paste con lo stencil Rays, poi ho aggiunto sulla parte destra il Distress ink Fired Brick e poi Stormy Sky. Con uno stencil ho aggiunto delle stelle usando i Distress Crayons Festive Berries, Chipped Sapphire e Picket Fence, poi ho fatto cadere delle gocce di colore bianco, rosso e blu. Ho ripassato i bordi con il Distress ink Black Soot.
Da un foglio di patterned paper ho ricavato una rosetta con la fustella 'Decorative Strip - Mini paper Rosettes' di Sizzix/Tim Holtz Alterations, ho punchato un cerchio e l'ho colorato con Stormy Sky, poi ho ricavato le scritte con mia Dymo.
Ho infine incollato la mia 'Doll' ed aggiunto un cordino in tinta...e la mia Tag è pronta!

Finally I got to use one of my new Paper Dolls byTim Holtz...when I opened the package and saw this 'little girl' with the flag I thought right away that she would be perfect for a project like this!
I usually have some Tags in my stash, ready for use, all die cuts using the 'Tag Collection' Framelits dies by Sizzix/Tim Holtz Alterations: for the background I just used Distress ink Mustard Seed then Distress ink Black Soot with Tim's Typo stencil.
Spread some Modeling Paste and Rays stencil, then added Distress Ink Fired Brick and Stormy Sky, added few stars with Distress Crayons  Festive Berries, Chipped Sapphire and Picket Fence. Spattered with red white and blue inks and painted the edges with Black Soot.
From patterned paper I die cut a rosette using  'Decorative Strip - Mini paper Rosettes' Die by Sizzix/Tim Holtz Alterations, punched a circle and painted with Stormy Sky, then printed the words with my Dymo.
At last I added my 'Doll' and a piece of twine...and my Tag is ready!


Happy & safe 4th of July Folks! See you next time!

Alla prossima!

Kisses&Hugs!
Simo