Visualizzazione post con etichetta 2018. Mostra tutti i post

domenica 15 luglio 2018

SUMMER DREAM...


Ciao a tutti e bentornati! Oggi vi presento il mio nuovo progetto per Scrap&Craft...un layout estivo...
Potete trovare il post originale sul Blog di Scrap & Craft QUI

Hello everyone! Today I want to show you my brand new project for Scrap&Craft...a breezy, summery LayOut...
You can find the original post on Scrap & Craft Inspiration Blog  HERE

Iniziamo...
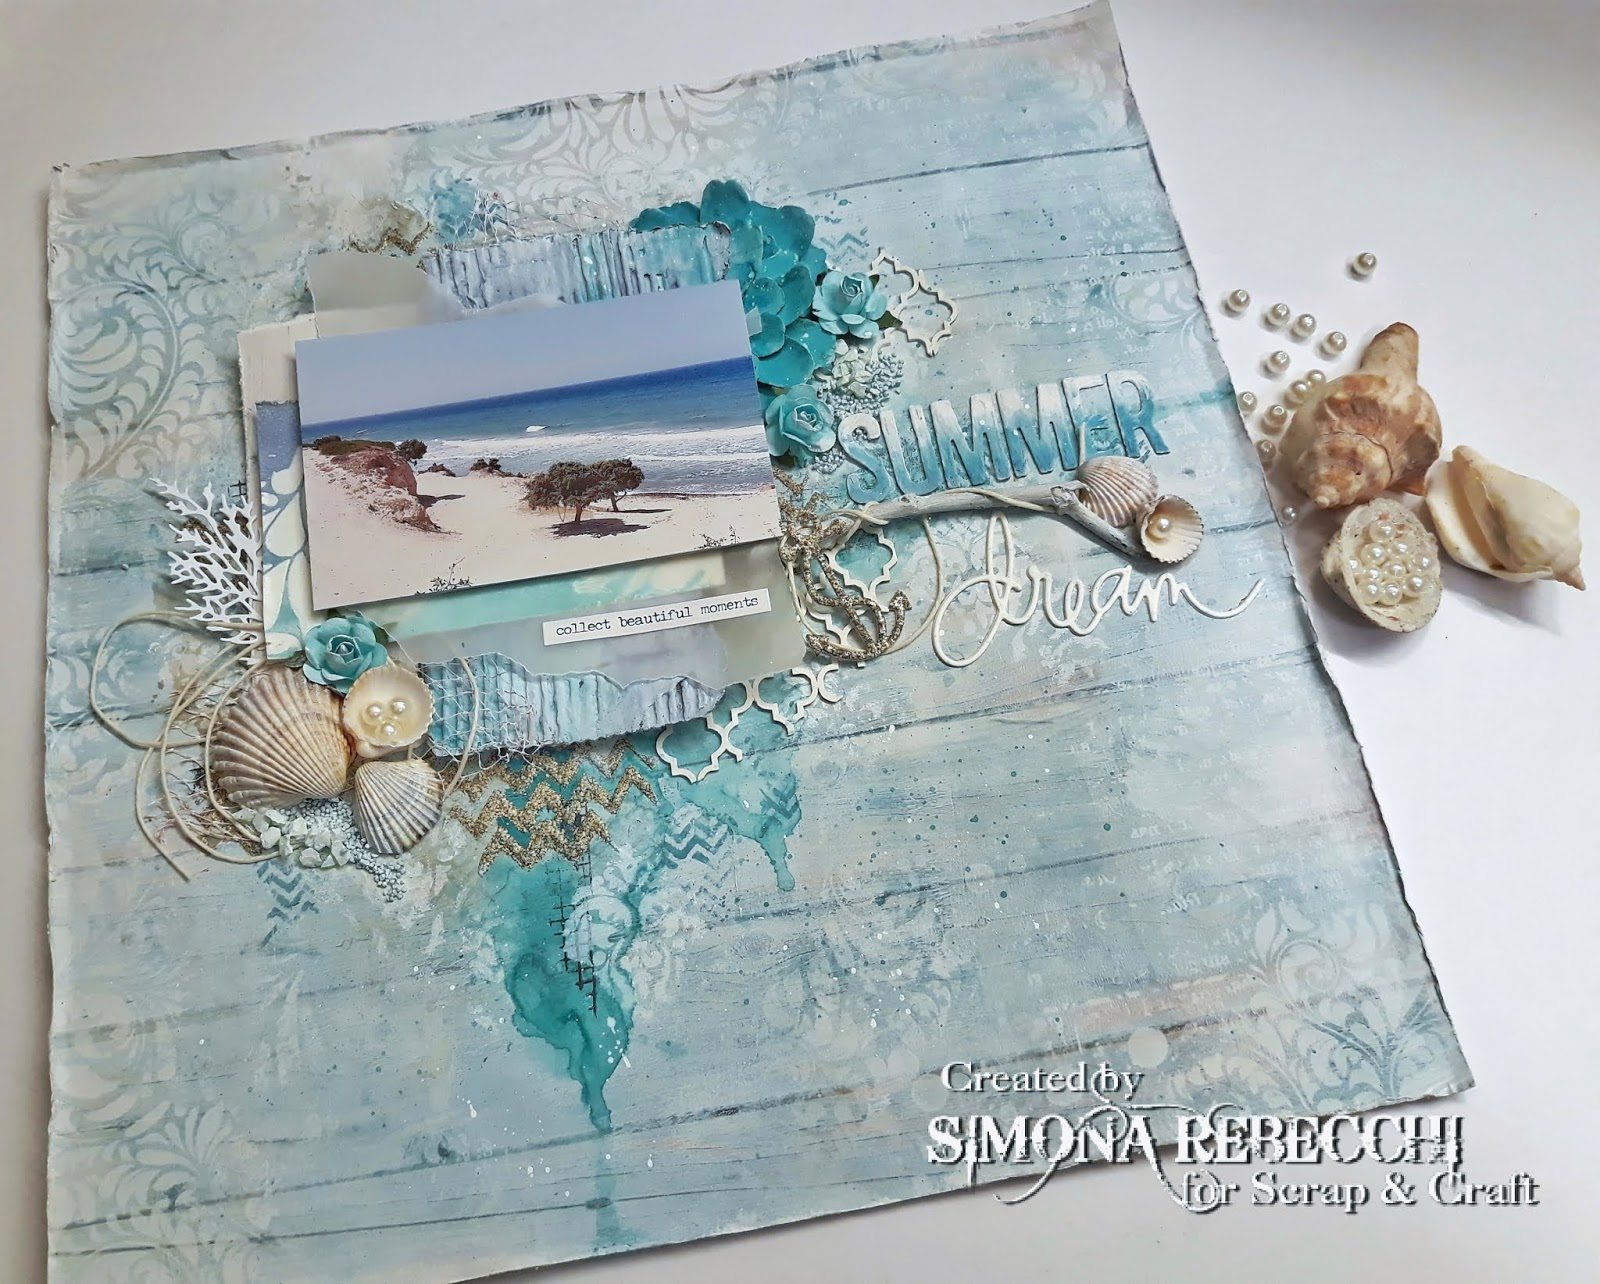
Ho coperto la pagina con Gesso Clear, poi ho steso del gesso bianco diluito con un rullo ed asciugato. Ho cercato la posizione giusta per la composizione e quando l'ho trovata ho aggiunto colore e texture...

Let's start...
I have covered the paper with Clear Gesso, then with a wash of white gesso added with a brayer.
Once I have found the perfect placement for my composition  I added colour and texture...


Ho usato i Distress Oxides Ice Spruce, Broken China e Frayed Burlap, poi ho aggiunto della modeling paste e mentre era ancora umida ho coperto con Dirty Sand Baked Texture ed embossato, aggiunto timbrate con Archival ink nero e con l'Oxide Broken China, poi ho usato lo stencil Gothic di Tim Holtz ed il colore acrilico Dylusions White Linen....

Have used Distress Oxides Ice Spruce, Broken China and Frayed Burlap, then added modeling paste and while it was wet I covered with Dirty Sand Baked Texture and heat set, added stamping using both black Archival ink and Broken China Oxide then used Tim Holtz Gothic Layering stencil with Dylusions White Linen paint...


Ho incollato i vari strati sotto la foto, usando cartone, cartoncini di recupero e del vellum e quando tutto era al suo posto ho aggiunto altro colore con InkExtreme Smeraldo di TommyArt...asciugato bene ed aggiunto gli elementi 3D...conchiglie, perle, fiori, un pezzetto di legno, delle chipboard e delle fustellate. Per finire ho fatto cadere gocce di Smeralso molto diluito ed inchiostro bianco.

Glued all the layers under the photo ...I have used a lot of scrap papers, cardboard and pieces of vellum, when everything was in its place I added more colour with Emerald InkExtreme by TommyArt...dried very well then added 3D elements...seashells, pearls, flowers, a piece of wood, chipboards and die cuts. To finish it off spattered with very diluted Emerald and white ink.

Ecco i dettagli...
Here's more details...


Ho usato il seguente materiale di /Used the following supplies from  SCRAP & CRAFT STORE:


Presento questo progetto per le seguenti Sfide:
I submit this project to the following Challenges:

- SIMON SAYS STAMP MONDAY CHALLENGE BLOG : SUMMER FUN


- MORE THAN WORDS JULY 2018 MAIN CHALLENGE: BEACH & SEASHELLS

For this month's challenge I took inspiration from the picture that I have used on the Layout...
I am very fond of this photo, taken last year on the beautiful and 'wild' Ag. Theologos beach in Kos...the mesmerizing sound of the waves and the amazing shades of the sea are still so vivid in my memories...I collected the seashells used, during my holidays in different Greek Islands, through the years...I'm not much of a 'Sun tan at all costs' person...fair skin and hair really do not help, lol! But I love strolling on the beach, looking for 'treasures' to be added to my stash of  'Holiday keepsakes'!

E con questo è tutto...spero vi sia piaciuto! Buona Domenica e...ci vediamo alla prossima!

That's it...hope you enjoyed this project...Have a great Sunday and....see you next time!

Kisses&Hugs!

Simo


EDIT:
Sono felicissima di essere stata inserita nello SPOTLIGHT di More Than Words con questo Layout!
Grazie!

I am so happy and proud to have been featured in the SPOTLIGHT at More Than Words with this LO! Thank you so much!

E di essere stata inserita nell'elenco delle HONOURABLE MENTIONS per la sfida di Luglio!

And to be featured into the HONOURABLE MENTIONS for the July Challenge!

domenica 1 luglio 2018

Scrap&Craft DT: Curiosity...a Mini Inspirational Journal


Ciao a tutti e bentornati! Siamo già a Luglio...non riesco a crederci...vi state già godendo le meritate vacanze? Per me il mare...cioè la Grecia, lol...è ancora distante, quindi mi distraggo con questo Mini Inspirational Journal...chissà...magari leggendo frasi ispirate e motivazionali sento meno il bisogno di scappare su una spiaggia greca...he he he...
Come sempre potete trovare il post originale su  SCRAP & CRAFT Blog .

Hello everyone and welcome! And July is here.. hard to believe it...are you already enjoying your well deserved summer holidays? Mine are still quite far ahead, so I try not to think about them too much, with the help of this Mini Inspirational Journal...who knows...maybe reading inspirational and motivational quotes will ease my need to run away on a pristine greek beach...he he he...
As always you can find  the original post on the SCRAP & CRAFT Blog .

Ho deciso di creare questo mini Art Journal per raccogliere i vari cartoncini e fogli utilizzati per fare pratica con varie tecniche o per testare materiali nuovi. Il fatto di aggiungere su ogni pagina una frase ispirata (dagli Small Talk di Tim Holtz) mi ha fatto venire l'idea di trasformarlo in un vero e proprio Journal motivazionale!

I have decided to create this little Art Journal in order to store in one place those pieces of cardstock that I use to practice new techniques or test new products...Then the idea to add a lovely quote to each page (using Tim Holtz Small Talk stickers) turned this 'practice journal' into an Inspirational Art Journal !

La struttura del mini è davvero basica...ho usato del cartoncino nero pesante come supporto per ogni pagina, poi con lo stesso cartoncino ho creato una 'cerniera' che mi permette di collegare tra loro le varie pagine, lunga quanto il journal e larga 1 pollice, poi piegata a metà. Ogni volta che ho una pagina nuova la incollo semplicemente con del nastro biadesivo ed aggiungo una nuova 'cerniera'. Facilissimo!

The structure itself is really basic...used black thick cardstock as a base for each page, then cut a 1" wide piece of cardstock and scored in half to create an hinge...everytime I have a new page I simply stick it to the black cardstock with double sided tape, and add a new hinge. Easy peasy!

Qui potete vedere la copertina e la prima pagina...in QUESTO POST parlo della nascita di questo journal...

Here you can see the cover and the first page....THIS POST is how this journal came to be...


Ecco qualche dettaglio...  Here's few details...


Per creare questo spread un po' grunge ed un po' romantico ho aggiunto interesse e texture con timbrate, modeling paste e washi tape. Ho usato i Distress inks e crayons Walnut Stain e Black Soot per aggiungere colore e profondità, poi dei tocchi di inchiostro bianco per dare un po' di luce.
Per l'immagine centrale ho usato un timbro che adoro di Stamperia, ho aggiunto ombre e colore con dei Markers e poi la cornice chipboard embossata con la Baked Texture 'Patina Oxide' di Seth Apter...adoro questo effetto!

To create this grungy and yet romantic little spread I added texture and interest with stamping, stenciling and washi tape...used Walnut Stain and Black Soot Distress inks and crayons to add depth, then splashes of white to highlight. 
Used a stamp from Stamperia for the focal image, adding shadows and colour with Markers, and then  a beautiful chipboard frame that I have embossed with Seth Apter's Baked Texture 'Patina Oxide'...love this effect!


Questo è il materiale usato dallo Store di SCRAP & CRAFT:
These are the supplies used from SCRAP & CRAFT STORE:


E questo è tutto...spero vi sia piaciuto questo progetto...buona Domenica e...ci si vede alla prossima!
That's it...hope you enjoyed this project...have a great Sunday! See you next time!

Kisses&Hugs!
Simo.

martedì 12 giugno 2018

WHEN IN DOUBT....ART JOURNAL!


Ciao a tutti e bentornati! Oggi vi mostro uno spread nel mio Dylusions Art Journal...era da tempo che volevo disegnare una delle mie 'whimsy girls' dagli occhi grandi...e ieri avevo proprio bisogno di staccare e 'spaciugare' per bene! Stamattina poi mi sono dedicata alla mia ragazza...
Poi...guarda il caso...ma non vuoi partecipare alla Sfida del Lunedì di SIMON SAYS STAMP, visto che richiedono QUALSIASI COSA BASTA CHE NON SIA UNA CARD? Lol!

Hello everyone and welcome back! Today I'm sharing with you the latest spread in my Large Dylusions Journal...it was some time that I wanted just to have fun and draw one of my 'whimsy big-eyed girls' ...and yesterday it was one of those days when all you need is some time off to get inky hands! This morning when the background was set I took my time to finish off the girl...
Now...why not submit it to the SIMON SAYS STAMP MONDAY CHALLENGE, as  they require ANYTHING BUT A CARD? Lol!

Ho iniziato a decorare il background senza particolare senso, aggiungendo diversi tipi di carta, compreso del washi tape per creare texture, poi ho aggiunto della modeling paste con uno stencil Carabelle (Ronds concentriques). Come potete vedere avevo usato una facciata per 'ripulire' i foam degli Oxides...

I started my background with nothing particular in mind...just wanted to create texture, so I added different kind of paper and some washi tape, then added modeling paste with a Carabelle stencil. (Ronds concentriques)...As you can see I previously used a page to 'clean up' my Distress Oxides foams...


A questo punto ho coperto con del Gesso bianco applicato a spatola e poi ho disegnato il viso con una matita in grafite acquarellabile, tanto per avere un'idea di dove mettere il colore. Poi ho usato i pigmenti in polvere della 13Arts, Rainbow colors Duo Turquoise, Yellow Amber e Pistachio Green, spruzzando con acqua per riattivarli. Una volta soddisfatta del risultato mi sono dedicata a colorare la girl, usando gesso bianco ed acrilico color carne come base e poi aggiungendo i vari colori con Tombow dual Brush pens, Zig Art&Graphic Twin della Kuretake, Gelatos e Polychromos della Faber-Castell. I colpi di luce sono fatti con Uniposca bianco ed i contorni con un marker nero punta fine. Ho usato un paio di stencil della 13Arts (Dots e Your Art) ed aggiunto delle timbrate con un mini timbro della Carabelle ed infine fatto cadere delle gocce di inchiostro 'Splash' nero e bianco. Per il sentiment ho incollato uno sticker della collezione 'Aura Rosa' su un pezzo di carta patterned della collezione 'Until Down', sempre della 13Arts.


I covered the pages with white gesso using a pallette knife, then drew the girl with watersoluble graphite pencil. I added the colour using 13Arts Rainbow color Duo watercolour powders, Turquoise, Yellow Amber and Pistachio Green and spritzed with water. When satisfied with the outcome I started to paint my girl using white gesso and a flesh colour acrylic paint, then used Tombow dual Brush pens, Kuretake Zig Art&Graphic Twin , Faber-Castell Gelatos and Polychromos , white posca pens and black markers. Added more touches with 13Art stencils (Dots and Your Art), then used a tiny stamp by Carabelle and spattered with Splash white and black inks. The sentiment is a sticker from 'Aura Rosa' added to a piece of patterned paper from Until Down collection, all by 13Arts.


Io sono molto soddisfatta di come è uscito questo spread...prevedo altre Big eyes girls...

I am very happy with the results...guess there will be more big eyes girls in my Journal...

Grazie per essere passati di qua...ci vediamo alla prossima!

Thank you for stopping by...see you next time!

Kisses&Hugs!
Simo.

domenica 13 maggio 2018

MEMORIES...


Ciao a tutti, buona Domenica e buona Festa della Mamma!
Oggi vi presento il mio nuovo progetto per il DT di MarteLAB, dedicato ad una mamma speciale...la mia nonna materna...QUI sul Blog di MarteLAB  potrete trovare il tutorial in Italiano... qui sotto, invece proporrò il tutorial in inglese.

Hello my friends happy Sunday and Happy Mother's Day!
I have made a Mixed Media Layout for MarteLAB DT, and I have decided to dedicate it to a very special Mom...my Grandmother! Unfortunately I have never met her, but I have come to know her a bit through my Mother's memories, and with this LO I wanted to celebrate them both.

I have glued together  three sheets of designer paper and distressed them with my scissors. Applied Clear Gesso and then a very thinned layer of White Gesso, tied some string across the middle then added Modeling Paste through two Tim Holtz Layering Stencils - one is from Mini Set #24 and the other is 'Roses'. While the paste was still wet I added some lace, adding also Prima/Finnabair Soft Matte Gel, then let dry. To add colour I have used PaperArtsy Infusions 'Frankly Scarlet' and 'Terracotta',  TommyArt Ink Extreme 'Bordeaux'  then Lindy's Gang Starburst 'Hottie Patottie Hot Pink' , Moon Shadow Mists 'Violaceous Violet' and 'Phantom Fuchsia'. Once dry I used the 'second generation' stamping technique with Black Archival Ink and Prima/Finnabair 'Messy' stamp. I spattered with the inks, adding also some white ink drops.


I have then built my composition using leftover papers, more lace and thread, added my GrandMother's picture, that I have 'aged' using Distress Inks, a frame die cut with 'Ornate Frame #2' BIGZ Die by Sizzix/Tim Holtz Alterations and a chipboard word... I have covered these two pieces with Heavy Black Gesso then added touches of Metallique Waxes 'Old Silver' and 'Vintage Gold', all by Prima/Finnabair, then some Prima flowers that I have sprayed with the inks mentionned before.


I submit this project to the following Challenge:

MORE THAN WORDS MAY 2018 CHALLENGE: MEMORIES & FRAME
All this project is about MEMORIES...of my childhood when my Mum used to share cherished memories about her own Mother, of my heritage, discovering traits and similarities in old pictures kept in a drawer...of my Mum, who is always in my thoughts...Happy Mother's Day!

Thank you for stopping by...See you next time!

Kisses&Hugs!
Simo.

sabato 10 marzo 2018

HAPPY LITTLE STAMPERS MARCH 2018 ATC CHALLENGE: SPARKLE...


Ciao a tutti e bentornati...Eccoci all'appuntamento con HAPPY LITTLE STAMPERS ATC CHALLENGE per il mese di MARZO il tema è 'SPARKLE'...quindi tirate fuori tutto ciò che avete di luccicante. glitter e brillantinoso !!!

Hello everyone and welcome back...Here we are for another HAPPY LITTLE STAMPERS ATCCHALLENGE, for MARCH we are going to 'SPARKLE'...so it's time to use everything sparkling, glittery and shiny you have in your stash!!!


Il vincitore di questa sfida riceverà un coupon di $20 da spendere nello SHOP! Potete trovare tutti i dettagli QUI.

Our winner for this challenge will receive a $20 coupon to spend at the SHOP! Check out all the details HERE.


Ho intitolato questa serie di ATC 'JUST SPARKLE – Little Women' in onore della Festa della Donna appena trascorsa...per ricordarci di non far MAI affievolire quella meravigliosa scintilla che ci rende uniche...

I have named this serie 'JUST SPARKLE – Little Women' ...to honour Women's Day, that was just few days ago...to always remember NEVER to let diminish that wonderful sparkle which makes us unique...

Ho usato una striscia di carta per acquerello che avevo avanzato da un'altro progetto, di circa
4x11 pollici – tenete sempre presente che le misure delle ATC sono 2,5x3,5 pollici -
spruzzando in sezioni con i seguenti spray Starburst della Lindy's Stamp Gang:
  • Time Travel Teal
  • Hydrangea Blue
  • Screamin' Banshee Black
asciugando tra un colore e l'altro, e spruzzando una seconda volta solo in alcune zone, per creare piu' giochi di luce (dal momento che questi colori , una volta asciutti hanno degli effetti 'brillantinosi' fantastici)

I have used a strip of watercolour paper, a leftover from another project, of about 4x11 inches – always keep in mind that ATCs dimensions are 2,5x3,5 inches – and sprayed the following Starburst sprays by Lindy's Stamp Gang, trying to divide them in sections:
  • Time Travel Teal
  • Hydrangea Blue
  • Screamin' Banshee Black
always drying before adding the next colour, and spraying twice only in few spots, to create even more shimmering effects.


Dopo di che ho tagliato le ATC a misura, poi ho aggiunto del Gloss gel con uno stencil  – lavate immediatamente stencil e spatola!
Ho lasciato asciugare all'aria.

After that I have cut to the proper size the ATCs, then added Gloss gel through a stencil – please remember to wash immediately both stencil and palette knife!
Let that air dry.


Ora dobbiamo solo aggiungere gli abbellimenti...con un'alfabeto a piacere ho creato la parola 'SPARKLE', l'ho timbrata con un tampone per embossing e poi ricoperta con polvere per embossing bianca. Ho fustellato delle stelline usando della gomma crepla glitterata, e creato dei puntini con un punch, poi ho scelto 4 Piccole Donne dalle Paper Dolls di Tim Holtz, aggiunto del filo bianco e 3 strass su ogni ATC.

Now it's time to embellish our ATCs...I have created the word 'SPARKLE' using an alphabet stamp set, stamped with Versamark ink then embossed using white embossing powder. I have die-cut 4 little stars from a glittered foam sheet and punched out few dots as well. Then chose 4 Little Women from Tim Holtz's Paper Dolls, added white thread and 3 iridescent stones on each ATC.


ATC 1 / 4 – JUST SPARKLE – LITTLE WOMEN – MEG


ATC 2 / 4 – JUST SPARKLE – LITTLE WOMEN – JO


ATC 3 / 4 – JUST SPARKLE – LITTLE WOMEN – BETH


ATC 4 / 4 – JUST SPARKLE – LITTLE WOMEN – AMY


E' tutto per oggi... ora tocca a voi creare le vostre ATC e postarle sul BLOG di HAPPY LITTLE STAMPERS ...vi aspettiamo!
Grazie per essere passati...spero vi sia piaciuto il tutorial! Ci vediamo alla prossima!

That's it for today...now it's your turn to create your ATCs and share them on the HAPPY LITTLE STAMPERS BLOG ...we are waiting for you to play along!
Thank you for stopping by...I do hope you enjoyed the tutorial! See you next time!

Kisses&Hugs!
Simo.

venerdì 9 marzo 2018

Whatever the weather...always take the scenic route!


Ciao a tutti e bentornati! Oggi ho fatto una tag veloce per partecipare alla sfida settimanale di SIMON SAYS STAMP MONDAY CHALLENGE BLOG..il tema è 'WHATEVER THE WEATHER' che in pratica significa 'Qualunque sia il tempo'...l'unica cosa certa era che volevo usare il mio adoratissimo Umbrella Man...e dal momento che nello spotlight ci sono proprio i prodotti targati 'Tim Holtz', quale occasione migliore di questa?

Hello everyone and welcome back! Today I have made a quick Tag for the weekly challenge over at SIMON SAYS STAMP MONDAY CHALLENGE BLOG...the theme is 'WHATEVER THE WEATHER'...I only knew that I wanted to use  my beloved Umbrella Man die...and as they are showcasing Tim Holtz products, couldn't think of a better chance...


Ho usato un cartoncino per alcohol inks della Ranger ed i Distress Oxides...
Ho prelevato il colore direttamente dal craft mat, solita tecnica, asciugando bene tra un colore e l'altro..questi i colori usati:
Fossilized Amber
Peacock Feathers
Broken China
Wild Honey
Aged Mahogany
Poi con il Blending tool ho aggiunto i colori direttamente sul cartoncino, cercando di non coprire le parti più chiare e quella nel mezzo, mantenendo i colori più scuri intorno a queste aree e sui bordi...
Broken China
Iced Spruce
Blueprint Sketch
Faded Jeans
Hickory Smoke
Black Soot
Ho asciugato bene, fatto cadere delle gocce d'acqua, asciugato e tamponato l'eccesso. poi usando usando sempre il Blending Tool ed un applicatore pulito ho steso pochissima Distress Micro Glaze con movimenti circolari. Dopo pochi minuti ho ripassato con un panno pulito per 'lucidare' il mio cielo...Ho mattatato su cartoncino nero, aggiunta la fustellata dell'Omino con l'ombrello (Sizzix/Tim Holtz Alterations Umbrella Man BIGZ Die).
Come sentiments ho usato uno sticker preso dagli Small Talk ed una Quote Chip, entrambi della linea Idea-ology di  Tim Holtz, ho aggiunto dei puntini bianchi per le stelle con Nuvo Crystal Drops - Simply White e qualche cristallo, ed un pezzo del bellissimo nastro della mia amica Rosanna.


For this project I have used Ranger Alcohol Inks Cardstock and  Distress Oxides...
Dipped the card into the colour on the craft mat, you know the gig by now, drying well between each layer...these are the colours used: 
Fossilized Amber
Peacock Feathers
Broken China
Wild Honey
Aged Mahogany
Then with a Blending tool  added the following colours on the cardstock, trying not to cover the part in the middle and the other clear ones, adding the darker shades mostly all around these areas and on the borders 
Broken China
Iced Spruce
Blueprint Sketch
Faded Jeans
Hickory Smoke
Black Soot
After drying well, spritzed&flicked some water, dried again then with a  Blending Tool and a foam applicator covered with a very light layer of  Distress Micro Glaze, with a circular motion. After few minutes used a cloth to 'polish' the card and make my sky shine... Taped down onto black cardstock, and added my lovely die-cut  (Sizzix/Tim Holtz Alterations Umbrella Man BIGZ Die).
As sentiments I have used a Small Talk sticker and a  Quote Chip, both from  Idea-ology by Tim Holtz, added few 'stars' using  Nuvo Crystal Drops - Simply White and few blings, and finished it off with a piece of ribbon beautifully hand dyed by my friend Rosanna.


Mi piace l'idea di questo distinto signore che, incurante della situazione climatica, se ne sta lì, ad ammirare in cielo...bisognerebbe ricordarci di prendere la 'Strada panoramica' più spesso, alla ricerca di nuove meraviglie...

I love the idea of this gentleman who, despite the weather, is standing there, looking at the sky in wonder...we should remember to Take the Scenic Route more often, looking for wonders...

Grazie per essere passati...ci vediamo alla prossima!

Thank you for stopping by...see you next time!

Kisses&Hugs!
Simo.

martedì 23 gennaio 2018

Tag ART...


Ciao a tutti! Si lo so...tre post in tre giorni...da non credere! Lol! Ma sono stati giorni intensi questi appena trascorsi...molti di voi avranno sentito parlare della manifestazione 'Creativation' (ex CHA) che si volge a Phoenix - Arizona...praticamente dove le ditte che creano tutti i prodotti che noi amiamo tanto usare ed i designers che tutti adoriamo, presentano le ultime novità del settore...insomma il paradiso dei crafters in terra...Ma grazie alla tecnologia ed alle dirette 'live' rimbalzate sui vari social, anche le persone come me, che  possono solamente sognare di partecipare ad un'evento  simile, hanno potuto essere in qualche modo coinvolte in tutto ciò! Un tripudio di colori, inchiostri, carte, fustelle, timbri, attrezzi...insomma ecco che la lista delle 'necessità' si allunga in modo vertiginoso...
Tra tutte queste dirette, quelle da me più seguite avevano un solo protagonista...TIM HOLTZ...e niente...io adoro quest'uomo! Geniale, ogni volta che fa uscire qualcosa riesce a rendertela necessaria, mostrando mille modi per usare i prodotti...e tra le varie tecniche che ha mostrato una mi ha colpito in modo particolare, non solo perchè l'ho trovata brillante, ma anche perchè, incredibilmente, avevo già tutto l'occorrente in casa...FINALMENTE!!!!

Hello everyone! Yes, I know...three posts in three days...hard to believe! Lol! But these last few days have been so amazing...many of you surely have heard about 'Creativation' (former CHA), that took place in Phoenix - Arizona...where all the companies behind the products we so love to use and the designers we all love, gather to introduce to the market the latest news...the crafter's heaven on heath!
Thanks to technologies and 'live' broadcasts jumping through the social media, people like me, who will never have the chance to attend such an event, just felt the exhilaration, the excitement of 'being there'! A whole lot of new colours, inks, dies, stamps, tools...a neverending list of new 'needs'...each day getting a bit longer...
Among all these 'live', the ones I waited for and cherished the most had one character only...the one and only TIM HOLTZ! I just love this man...he's a genius! He knows how to make every new release a necessity, just showing every different way to use his products...during his demos, one in particular got my attention...not only because it was brilliant, but also because, for the very first time, I had all the products needed in my stash....FINALLY!!!

Quindi senza ulteriori indugi ecco la mia tag...
Therefore, without further ado, here's my tag...


In pratica si crea uno sfondo con i Distress Oxides, utlizzando come supporto i cartoncini 'Alcohol Inks Cardstock' della Ranger. Questo tipo di cartoncino ha una superficie Lucida, ma per come è stato concepito in pratica assorbe il colore. Una volta creato lo sfondo con gli Oxides, si verrà a creare una superficie opaca, ossidata appunto, ma basta applicare un po' di Distress Micro Glaze per far risaltare tutti gli strati dello sfondo e contemporaneamente ridare brillantezza al tutto (e renderlo waterproof).
Ho usato i seguenti Distress Oxides:
Antique Linen + Frayed Burlap
Vintage Photo + Spiced Marmalade
Peacock Feathers
Walnut Stain
Black Soot
Fired Brick
Spiced Marmalade
Quindi dopo aver 'strisciato' il cartoncino nel colore steso sul Craft Mat (spruzzato con acqua), varie volte, ed asciugato tra una passata e l'altra, ho stampato varie immagini con inchiostro archival marrone ed usato inchiostro Archival nero per le immagini che volevo in evidenza ('Dapper', 'Lady Rose' sets di Stampers Anonymous/Tim Holtz ed un timbro con farfalle dal set Tim Holtz Alcohol Inks Kit di Ranger).
Asciugato e poi passato la Distress Micro Glaze con un blending tool, aspettato che si asciugasse e ripassata con un panno per renderla lucida. Ho ritagliato con la fustella più grossa del set 'Tag Collection' di Sizzix/Tim Holtz Alterations, ho incollato la tag ottenuta su cartoncino nero e poi su un pezzo di sughero che ho ritagliato per dargli la forma di una tag. Ho aggiunto degli ingranaggi ritagliati con la fustella 'Gadget Gears 2' Sizzix/Tim Holtz Alterations, su cui ho aggiunto un po' di Alchemy Wax 'Metallique' Vintage Gold di Prima/Finnabair, e per finire una Quote chip, una Memo pin ed un Adage Ticket della linea Idea-ology di Tim Holtz.


Basically you create a background using Distress Oxides on an Alcohol Ink Cardstock by Ranger...though the surface is Glossy, the ink just soaks in. Once the backgound is completed and you have a now oxidized cardstock, all it takes is Distress Micro Glaze to make all the layers to stand out and the surface to be shiny again, and waterproof.
I have used the following Distress Oxides:
Antique Linen + Frayed Burlap
Vintage Photo + Spiced Marmalade
Peacock Feathers
Walnut Stain
Black Soot
Fired Brick
Spiced Marmalade
So I just dipped my Glossy cardstock in the Oxides 'smooshed' and spritzed onto the Craft mat, drying between layers, then stamped my images for the background with brown archival ink and the ones I wanted to be on top with a black  archival ink (I have used 'Dapper', 'Lady Rose' sets by Stampers Anonymous/Tim Holtz and a butterfly stamp from Tim Holtz Alcohol Inks Kit by Ranger).
Blended in the Distress Micro Glaze with a blending tool and polished with a towel. From the cardstock I have die-cut a Tag using the 'Tag Collection' set of framelits by Sizzix/Tim Holtz Alterations, pasted onto black cardstock then onto a piece of cork. Added a couple of die-cut gears from the 'Gadget Gears 2' die by Sizzix/Tim Holtz Alterations, aged with 'Vintage Gold' Metallique Alchemy wax by Prima/Finnabair. To finish it off added a Quote chip, a Memo pin and an Adage Ticket, all from Idea-Ology by Tim Holtz

Do you see the shine? I love this technique!!!


Con questo progetto partecipo alle seguenti sfide:
I submit this project to the following challenges:

- SIMON SAYS STAMP MONDAY CHALLENGE - TAG IT

- SANDEE & AMELIE'S STEAMPUNK CHALLENGE - 
  ANYTHING GOES - STEAMPUNK/INDUSTRIAL

E con questo è tutto...grazie per essere passati, alla prossima!

That's it for today...thank you for popping by...see you next time!

Kisses&Hugs!
Simo.